Saturday, May 30, 2020

Adding tail lights to the Amtrak Superliner

I wanted to add working tail lights to the last car on my Amtrak California Zephyr train like the ones in this prototype photo.

So I decided to make my own working tail lights on one of my Amtrak sleeper cars.

The stock lenses are solid red plastic so I replaced them with my own made from .040 fiber optic.  I mushroomed one end by holding it close to my soldering iron.  This helps the fiber optic capture more light.  After cutting to the right length, the cut end was sanded smooth.

The openings left by removing the stock red plastic lenses needed to be slightly enlarged to fit the new fiber optic lenses.  Then the fiber optic lenses were installed from the inside.


Using some small LED's from one of my boards, First I tried to paint them red but when gluing them in place the red paint dissolved so I made filters from disks punched from a sheet of .010 red translucent polystyrene sheet.
A simple circuit of bridge rectifier, 5 volt voltage regulator, and super capacitor are attached to the bottom of the upper deck with E6000 adhesive.


Some of the interior walls had to be notched or removed from the floor section for the circuit to fit. 
So that the circuit components would not show through the lower windows, those windows were painted a gunmetal color from the inside giving them the look of being darkly tinted.

Once the windows and upper deck were re-installed the circuit was tested for a couple hours to make sure the components would get hot.  They don't even get warm because the current used is very small.

And this is the result was looking for.

Because DCC power is always on the track, the LED are always lighted.  And with the super capacitor in the circuit acting like a "keep alive" circuit they don't flicker with interruptions of contact and will even stay on for several seconds when the car is removed from the track.

Sunday, May 24, 2020

First working signals on the layout

I have always enjoyed railroad signals on a layout but have also found them to be one of the more challenging things to accomplish correctly.  In the past either on modules or on friend's layouts I have installed a few signals that were animated with either a connection to a turnout or a detection and timer type circuit.  This time I wanted to try some actual occupancy and the helix seemed to be in need as I had a couple of occasions recently where I have lost awareness of which track in the helix a train was on.

For detection I was thinking of using the occupancy outputs on the PSX-1's but found that they would not drive my low current relays so I instead used NCE DB20 block detectors.  Check this recent post to see how these work.   These were mounted under the helix.


Where the lower yard goes into the helix this is the searchlight signal that indicates occupancy on the inner loop of the helix.

The pole and mounting bracket were made from brass, then a #6 washer was used for the target and the hood was made from polystyrene tube.  The LED is bi-color and 3 mm size.  Magnet wire was run down the brass tube pole.


Where the upper yard enters the helix I made the same type of searchlight but without the pole.  Instead it was attached to a bracket that was mounted to the side wall of the helix.

This signal indicates occupancy on the outer loop of the helix.
Both signals are mounted near where the gap is between the helix PSX-1's and the yard PSX-AR's.

Here the signal has turned red as the train has crossed into the helix.  In the case of this Amtrak train the entire train must clear the helix because of the wheel contacts on the Kato passenger cars.


These signals would be close to O scale in size but since they are in the staging yard that is not an issue and it has given me a chance to get into some signaling.  The next step will be to buy or make some signals closer to N scale for the top of the helix.  

Monday, May 18, 2020

N Scale roots - cast resin vehicles

There was a time when very few mass produced motor vehicles were offered in N Scale and most of those were models of European prototypes.  Because of the small size, cast resin vehicle models were practical and several smaller manufacturers developed cast resin kits for the N Scale market.  I had purchased and built my share of these in the 1990's.

As time went on some great ready to run plastic and metal N Scale vehicles became available and my box of yet to be finished cast resin kits got neglected.  Every one in a while I get the itch to pull one or more of those old kits out and finish them.     Recently I finished two more kits to create some trucks I wanted for the layout.

I chose this Lineside Models cast resin kit to make a Western Pacific Maintenance of Way truck.  In the past I have had some problem with wheels coming off when just attached with adhesive so I made axles for these which should give them a bit more support.  I used the metal front wheels that came with the kit and some cast resin wheels I had for the rear.
The yellow I painted this model with was not much different than the raw casting.  The windshield and window were painted gunmetal, the tires weathered black and the hubs engine black.  The Western Pacific decals were from nscalekits.com and the license plates from Microscale.
As even in my earliest layout era this early 1960's model would have been in service for quite a few years it got a good amount of weathering.  From my details bin I found a barrel and a stack of ties and then glued together a stack of scrap code 55 rail for a load.
The second vehicle project was using the back end of a Cars N Scale fuel truck and mating with with a cab from an Athearn Ford C cab tractor.  This makes the model fit more closely to my earliest layout era plus I like the detail on the Athearn model.  That 54 Mack cab from the resin kit is great too and I'll use it somewhere, someday.

So here is the finished fuel truck that will serve the diesel distributor in the 70's - 82 era.   I am working on some other trucks that better fit different layout eras but I won't have to use the TomyTec model of an Isuzu milk truck as a stand in anymore.

Wednesday, May 13, 2020

The latest in track cleaning

Recently I came across a YouTube video about using something called NO-OX to clean model railroad track.  After looking at a few more videos and also finding some other references to it on the internet I decided that I wanted to give it a try.   Turns out that this has been around for years and I was quite surprised that I had not heard of it before.

Shopping for NO-OX I found that it is used in a wide range of applications to prevent corrosion and to promote electrical conductivity.   

I ended up buying this 8 ounce tube on ebay.  Considering the tiny amounts used to clean track and how long the effects of an application are supposed to last this tube may last me for a very long time.
Because this is a paste like substance I was concerned about loose ballast getting stuck to it so want to keep the application very thin.  The way I applied the NO-OX was to smear a thin layer onto the pads of my Woodland Scenics track cleaning tool.   Did not press hard, just slid it around the track.

I still use my Aztec track cleaning cars with the frabic rollers and my home made Masonite wiper car.  I may also be able to use one of the wiper pads on my Atlas motorized track cleaning car to get into the spur tracks.


It has been about 3 weeks now since I have started using this product and the results have been quite noticeable especially at slow speeds.  The one application 3 weeks ago has not been repeated except for a few areas where I had leaned on the track while working on the layout.

Monday, April 27, 2020

First Showcase Miniatures MoW truck

I have had this kit for a few months and just recently finished it.  I have done a few GHQ white metal vehicles in the past but this is my first vehicle from Showcase Miniatures.  They do seem to offer the best variety of Maintenance of Way (Mow) vehicles in N Scale and I may add a few more over time for my different railroads and layout eras.

For my first one I got kit # 41 which is a boom truck built on an International truck frame. Each of these kits comes in a plastic box like this one.


Here are the parts that were in the package.  There are extra parts for the boom and outriggers to build in either an in use or stored position.  The smaller parts needed to be cut from a common base and very little filing was needed to clean up flash.
I often like to work on models from a reference prototype photo.  The closest photo I could find on the internet was this one.  It is not really the same configuration but still helps with how to do lights, stripes, and other details. 

I use mostly Acrylic paints these days but on metal vehicle kits I like enamels as the Acrylic seems to chip off too easily with handling.  For the white body I used the same paint that I use for locomotive hand rails.  Testors racing finish is quite durable but the brush needs to be cleaned with enamel thinner, mineral spirits won't do.  The frame and tires were done with Floquil enamels.


Once the main components of the truck were assembled and a few of the detail parts added, it was time of decals.

I used decals from circuscitydecals.com.  This set included some yellow stripes similar to those in the reference photo.


And here is the finished model after applying the decals and a spray of Dulcote.  Because this is a high rail vehicle with the extended front bumper I added some guide posts with .020 brass wire in pilot holes that appeared to be there for this purpose.

Sunday, April 19, 2020

More additions to the DCC system

As this layout has grown and experience with operating it has been gained the Digitrax DCC system has also been expanded and modified.  Here are the latest changes.

I recently acquired another UT4 IR throttle and replaced the stock long coiled cord with a short straight one.

Then I made up two more throttle holders like the ones in THIS POST from December of 2018.
The new throttle holders were mounted with another UP5 panel in the staging yard area.  This area now has a place for 4 throttle with these UP5's being always powered.
The one throttle holder left from the first batch was mounted next to the system drawer at Harney.  This was needed so an operator at Battle Mountain would have a place to set the throttle if 2 hands are needed for uncoupling.  With 6 throttle holders around the layout hopefully no more dropped throttles.

This is a drawing I started of the layout of the DCC system.  It is not likely that I will need to add any more panels but the three DS64's may get connected to the LocoNet in the future.

Sunday, April 12, 2020

Detailed interior for the warehouse

One thing I skipped over until later when I built the warehouse in Battle Mountain was some interior detail and lighting.  This warehouse is a shallow relief structure that represents part of a larger facility that produces cat litter.   Finished product is typically shipped in 50 pound bags stacked on pallets.  Car load shipments are made to several wholesale pet supply distributors and retail chain distribution centers all around North America.

This Preiser set is something I have had for years and had only used a few items from it.  It has many items that are great for a warehouse scene.   The stacks of bagged cargo are perfect to represent the bagged cat litter and I'll use some of the pallet jacks as well.


The 5 bag pieces from the Preiser set were placed on top of a stack of 5 Styrene tile sections.  The stacks were then painted white and weathered with black weathering wash to bring out some detail.

Then the finished stacks were glued to pallets from Micro Engineering set 80-144.

What I like to use to light the interiors of buildings are LED boards from N scale locomotives that I have left over from installing DCC decoders in.  I used two here and made a long enough lead to feed down a hole in the bench work.
On the internet I found a photo of the inside of a warehouse and combined several copies of it to make a background image that was then pasted onto a section of .030 Styrene sheet for the back wall.
The detail parts were glued to the floor inside and the photo back wall was attached with liquid styrene cement and scotch tape.

A hole was drilled through the bench work and the plug threaded through to connect to the 12 volt DC bus inside the bench work.
Here is the view of one of the doors.  Besides using the bagged loads from the Preiser set shown above, I also used two different types of pallet jacks.
 
The LED's provide just enough light to highlight what is inside.

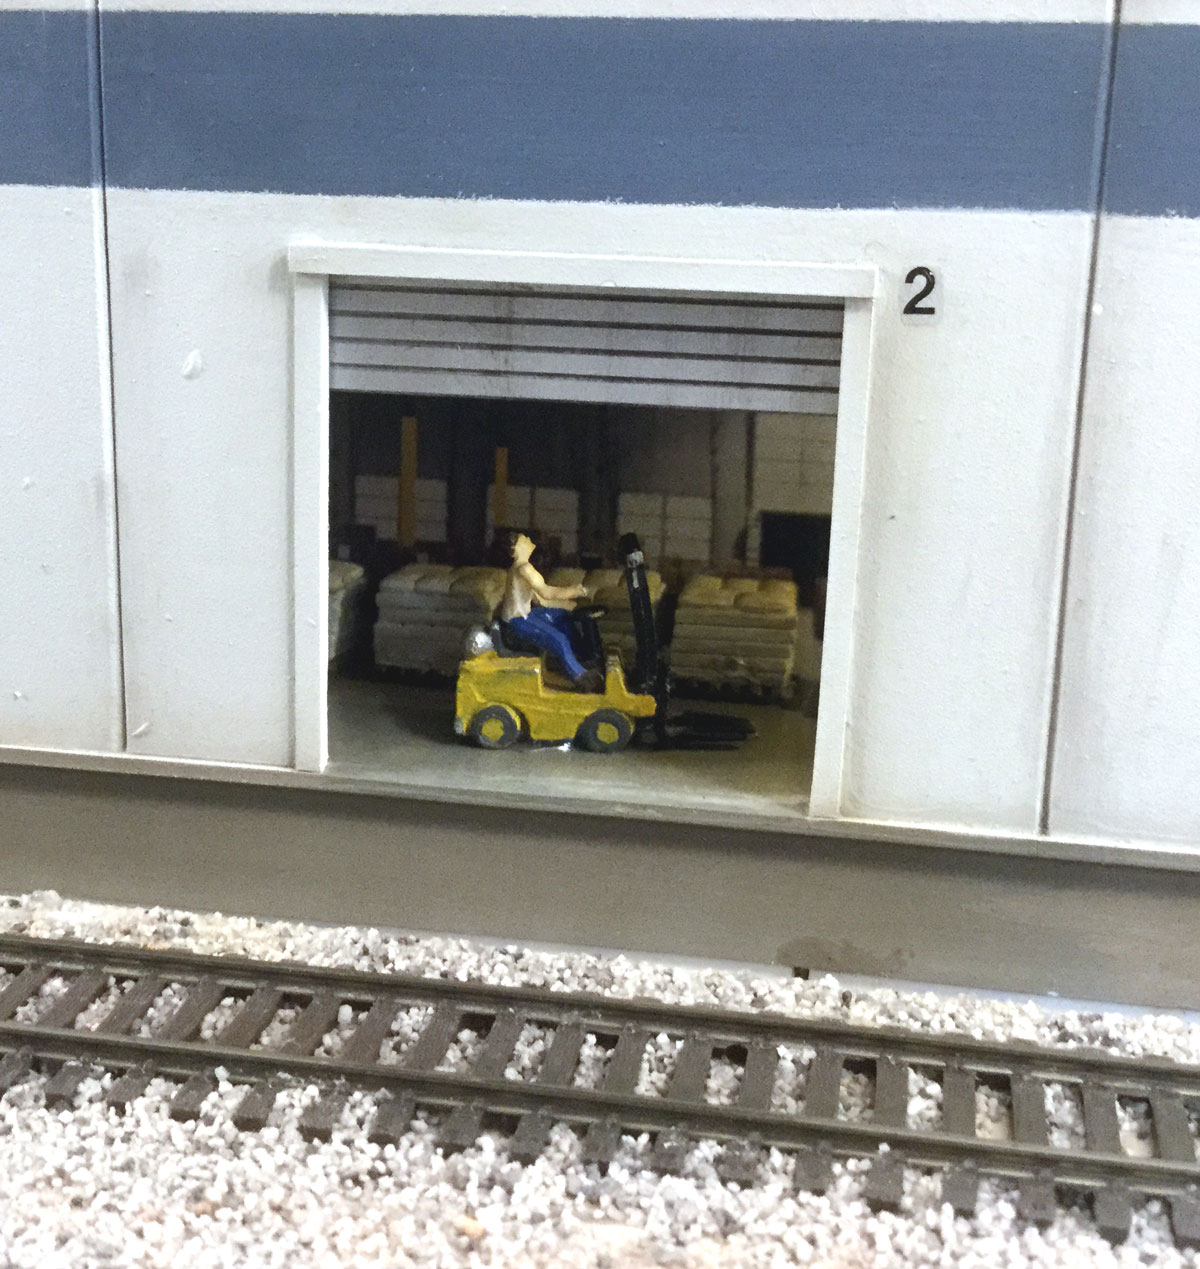
Here is the other door.  This forklift model another thing that I've had for many years and is being re-used again.

What happens in this shipping department is that pallets of the product are brought close to the rail car doors by forklift then workers load the pallets into box cars with smaller equipment.

Monday, April 6, 2020

Old school track cleaning car

When I returned to N Scale in the early 1990's Aztec Manufacturing was local to me and the Trackstar track cleaning car was the first choice among the local guys.  So of course I bought one which became several and still use them today.   Because of my early introduction to the Aztec cars, I had never had or built a Masonite slider track cleaning car so I thought it would be something fun to try.

For my project I choose this Micro-Trains covered gondola Western Pacific 6053 from my collection.

This model has separate plastic under frame detail which was removed.   Some of the detail molded on the bottom of the steel under frame was filed smooth.
A scrap of Masonite hard board was cut to a 1.75 x .75 inch size.  The ends were sanded at an angle and the sides rounded as shown in this photo to prevent an snagging.


The edges of the pad were blackened with a black sharpy pen and a pair of 1/4 ounce weights were glued to the smooth side of the smooth side the Masonite.  These weights fit between the sides of the car body.
A pair of holes were drilled through the Masonite and weights and small nails glued into them with the heads counter sunk into the fuzzy side of the Masonite.

A matching pair of holes were drilled through the steel under frame and car body floor.
The nails were cut so that they only stuck up about 1/4" from the floor when the Masonite wiper was pushed all the way up.  2-56 nuts were glued onto the ends of the nails.  The right thickness nails could have been threaded.

This pair of photos show the Masonite pad in it's fully extended and retracted positions.  It can move up and down freely about 3/16 of an inch to allow it to move over any unevenness in the track.

With the pad, weights, nails, and nuts there is about 2 ounces of downward pressure of the pad on the rails.
I use this car with the cover on but suspect an open load could also be used as long as it was hallowed out in the right places to allow for free up and down movement of the nails.

Wednesday, April 1, 2020

Automation of the yards reverse loops

I have always been interested in making some things happen automatically on a layout.  This layout is giving me a chance to try out some automation ideas and this is the first one of these ideas that I have actually gotten to work on.

With this layout design it was not really possible to run a train totally hands free.  Which ever yard a train came into the turnouts that create the reverse loop would have to we moved to the correct position and then moved again for the train to leave.    The PSX-AR boards already take care of the track polarity but I wanted to automate the operation of the points on the reverse loops turnouts.

This diagram shows how I am doing this on each of the two yards using a combination of the detection sensors shown in the last post and IR sensors.
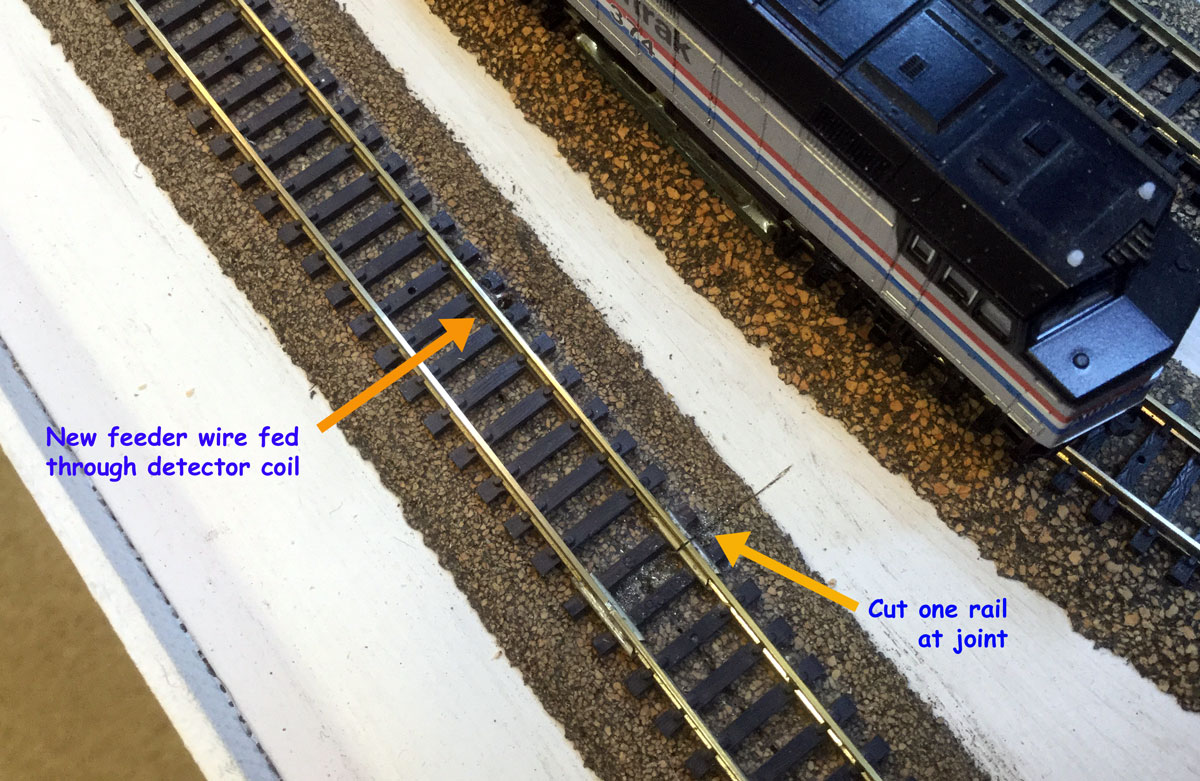
For the lower yard I cut a gap in one of the rails on the return track and then added an extra feeder wire that was fed through one of the detector coils before being connected to the track bus.
For the upper yard I am using the removable bridge on the return track as the point to trigger the reverse loop turnout to move to the diverging position.  It is already isolated with it's own feeder wires and one of those was fed through the other detector coil.


One feeder wire from each of track sections described above is fed through one of the coils on the detector board.

The detector assembly is mounted under the yard about where the the UP locomotive is in the previous photo.  This location is close to the feeder wires used for detection.


To trigger the reverse loop turnouts to move to the aligned position for trains entering the yards each line as an IR transmitter / receiver pair mounted on a wood frame at the top of the helix.  I was considering using the occupancy output from the helix PSX boards but that would cause the turnouts to change while part of a train is still crossing them.

This is the Azatrax IR control board that is located in the wall cabinet under the yard.

The normally open outputs from this board and the dual detector assembly are connected in parallel with push buttons on the control panel to set the turnouts in motion.
I have been running this circuit for many hours already while working on other project at the work bench and it works great.  Totally hands free with one train.  With more than one they may need to meet at the siding in Battle Mountain and that is done manually.