Thursday, December 21, 2023

Winter 2023 layout update

Today is the winter solstice, so a good date for the winter update on the layout.   In the fall update I had made up the tunnel portals for the Carlin tunnels on the east end of the layout and had installed the sky board and fascia around the upper helix.  Since then, I have built up the hillside in front of the sky board.  This was done with chunks of insulation board covered with plaster cloth.


The street that is in Carlin continues in this scene and disappears into the hills.  Currently I am working on painting the sky board and the road and installing some rock castings.


Again, this winter I am taking part in the trainboard.com winter layout party.  I always seem to get more done on the layout during these events and this year with all the track work finished I will be focusing on scenery.  Besides this hillside I will be working on some structures and industries in the Carlin area.

The large Ntrak club staging yard that I was working on in the fall got used in a layout at a show on the first weekend of December and performed perfectly.  After the show I brought home the end sections of our smaller yard as we were having the same type of problems with it as we were with the big yard.  That is, not routing power correctly.  I will be rebuilding all the Peco contact switches the way I did with the big yard.


Monday, December 4, 2023

Tortoise motor noise problem

In a post earlier this year, I reported about a Digitrax DS64 that had inputs that were no longer working.  I had replaced the DS64 with a control circuit I built myself.  This was on my WP staging yard. Recently I have been having some issues with the circuit that controls the SP yard as well. 

Specifically, the turnout at the wye that creates the return loop would sometimes cause the turnouts that control the siding on the return track to switch.  As this wye turnout can be triggered by a train passing a sensor while the train is still passing through the siding turnouts, this would cause a derailment.


The turnouts on this staging yard are controlled by three different circuits as shown in this photo.  One controls the yard ladder, another the wye turnout and the third controls the siding turnouts.


I suspected that some sort of noise was getting onto the input connections of the board that controls the siding turnouts.  This was confirmed by monitoring the inputs with an oscilloscope. The inputs to the circuit are normally high at +12 volts and when the buttons are pressed or the IR sensor activated, they go low to 0 volts.   On the oscilloscope it could be seen that spikes were randomly occurring when the wye turnout motor was running and occasionally when the spike was large enough the inputs to the siding control board were being activated.


What was happening here was that arcing between the motor's commutator and brushes on the wye turnout were creating these spikes and the magnetic field from those spikes on the motor wires was being picked up by the input wires on the siding control circuit.    Notice in the photo of the circuits how many of the wires are bundled together.  This can contribute to this happening as can the age of the motors.  The Tortoise motors on this layout range in age from 9 to 30 years old.  When I built this staging yard 9 years ago I twisted the motor wires which is supposed to help eliminate this problem and it did for a long time.

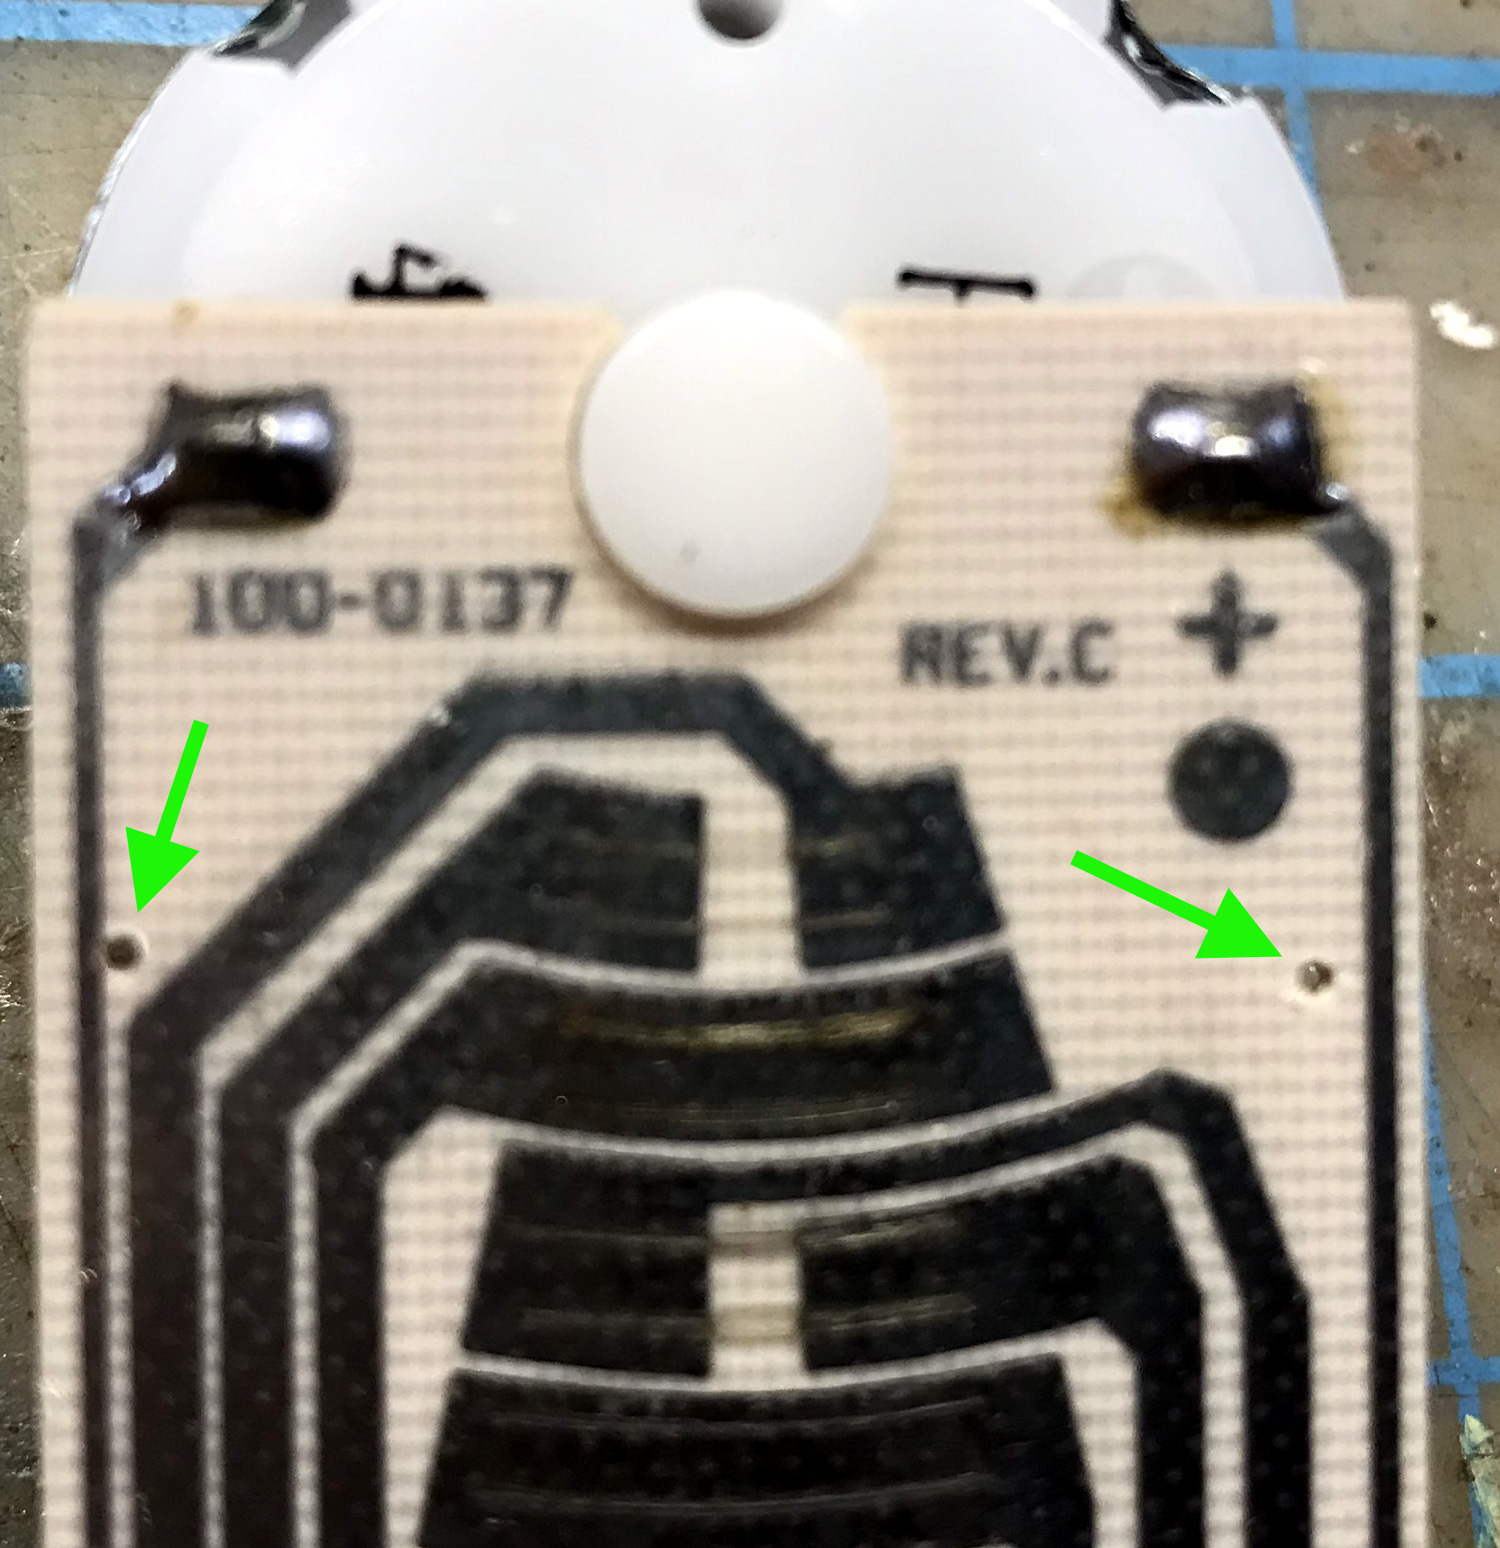
After reviewing several YouTube videos and some experimenting at the work bench I found the most effective solution was to suppress the noise as close to the source as possible.  I added a .01uf ceramic disc capacitor from each motor lead to the case of the motor.  After removing the motor from the Tortoise case, a pair of .039 holes were drilled in the circuit board at the locations pointed out with green arrows in the photo below.


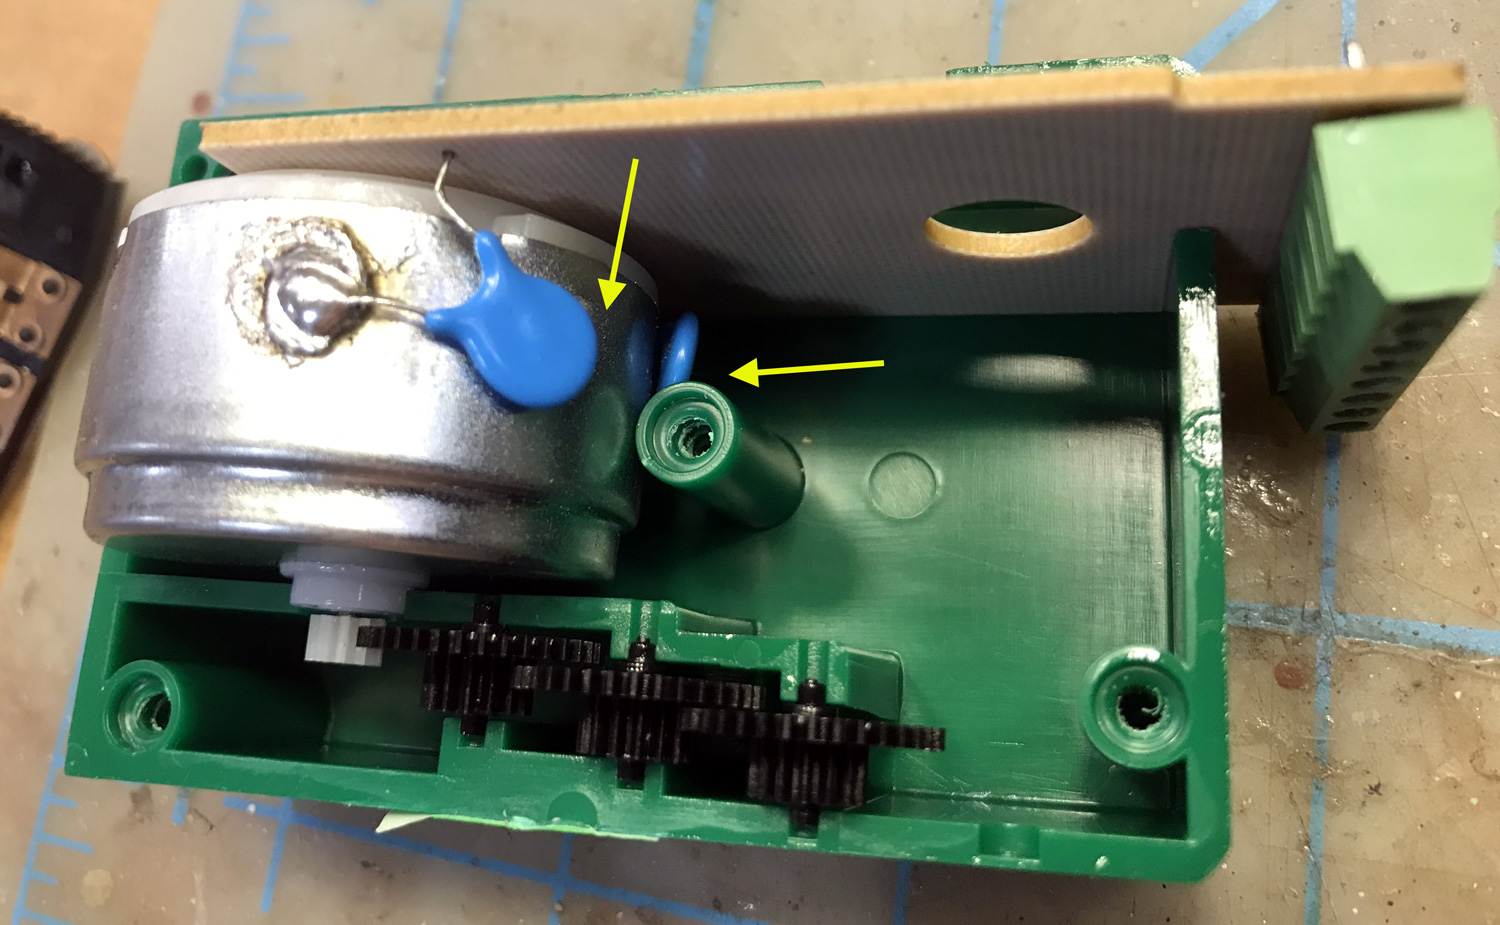
One lead of the capacitors were soldered to the case as shown in this photo.  To get a solder connection to the case I first scraped that spot on the case with a file and used flux and a hot soldering iron.  The other lead of the capacitors went through the holes in the board.


Then the leads that went through the holes in the circuit board were trimmed and soldered to the circuit traces as shown in this photo.


The placing of the capacitors this way prevents them from interfering with any of the moving parts inside the Tortoise housing and avoids the center screw mounts.


A recheck of the siding control inputs with the oscilloscope after the capacitors are installed shows a cleaner voltage with any spikes being very small.  After repeated testing, everything is working fine now.  I am now wondering if it was these voltage spikes that caused the inputs on the DS64 to fail.


Monday, November 27, 2023

On the road again - Suisun City, CA

We recently visited The Western Railway Museum which is about 95 miles north of home.


This museum owns 22 miles of the old Sacramento Northern line that ran between Sacramento and the Bay Area.  They have several pieces of equipment and are restored and operational that are used for excursions up and down the 5.5 miles of the line that they have operational.  The day we were there #4001 was in service. 


The route passes through countryside with low hills dotted with wind turbines.  The hills are brown and yellow this time of year but for part of the spring I bet they are green.  Winter is a good time to do this ride as it gets hot in the summer in this area and I don't think these older trolleys have any air conditioning.  The day we went was a beautiful clear day with almost no wind.

We made a couple of stops along the way and I found them all to be interesting.

After going around a return loop, the first stop we made was for the crew to pick up a token that was in a mailbox alongside the track to give them clearance to operate on the main line.  I've always heard of this type of operation, but this is the first time I've seen it firsthand.

Then, after maybe about 3 miles down the track, we stopped at a substation so someone from the crew could get off and turn the substation on.  The trolleys on this line use 600 volts DC power which requires a separate power district and substation every few miles.  They don't leave their remote substation on overnight so as we were the first excursion of the day it needed to be turned on before we could proceed into the next district.

The last stop was at a place called Pantano.  Here the passengers got off for a few minutes while the crew switched the trolley poles and reversed the seats for the return trip. 


The inside of the 4001 was fully restored and included some vintage advertisements like what used to be on the streetcars and buses I rode as a small kid.  Here are just a couple of examples.


The museum has several car houses.  I was able to go through car house # 1 which had 4 tracks full of vintage equipment in various stages of restoration.  Some were going to need a lot of work but at least they are indoors and hopefully will be restored some day.  One of the most nicely restored ones was the Petaluma and Santa Rosa # 63 which I recognized from a Northwestern Pacific RR book I have.  


I was surprised to also see some more modern equipment at the museum.  Parked in front of car house # 3 which was not opened for some reason was this set from the San Diego Trolley System and there was also a set from the Los Angeles Meto.  To me it seems strange to see these at a museum as they were something new that came long after my time living in both of these cities.


This museum has been here for a long time and I'm surprised that we had not gotten to it before glad we finally did as it was a fun way to spend a winter day.  


Saturday, November 11, 2023

Union Pacific fleet upgrade

Recently I have been on a bit of a buying spree.  A friend who was thinning his collection had a large number of Kato locomotives for sale.  These will replace a number of Atlas SD50 and SD60 models that have not run well for me on this layout.

These SD40-2's and the SD40 will fit in on both my 83-88 and 89-96 eras.  These are all decoder ready models, and I already had the decoders for them.  The handrails will get painted on those that are not already painted.


These Kato C30-7's will also work with both my 83-88 and 89-96 eras.  They are the older models that are not decoder ready but I swapped the mechanisms with a pair of Santa Fe models that already had decoders.  These will also get the handrails painted and I may do the number boards on them as well.


And last I aquired these Kato C44-9W's that will work in my 89-96 era as they entered service on the UP in 1994.  I already had the decoders for these as well.


Tuesday, October 24, 2023

Rebuilding Peco PL13 switch contacts

I have been working on a major side project.  I am doing an overhaul of the Ntrak club's 20 ft long staging yard.  Specifically, trying to correct the problem we have been having with getting the voltages to switch between tracks on the yellow and blue Ntrak lines.

This yard uses Peco solenoids to move the turnout points and separate solenoids with the PL13 switch contacts to route the power to each of the yard tracks.  Checking with an ohm meter these contacts were only intermittently making contact, making high resistance contact, and sometimes no contact at all.  No wonder we were having problems.


As these devices are widely used and rather expensive to replace, I thought it would be a good topic to present here what I have done to rebuild some of these that were not working correctly.

The PC board can be separated from the black plastic housing by pushing with a small flat blade screwdriver through one of the openings on either end of the housing.


Once the board was removed from the housing it could be seen that the contact areas of the board had become oxidized and worn.  Also, the two wiper parts bent at different angles, so it is likely one of them was not making good contact with the board.

I bent both contacts up at a sharper angle and tried to make that angle equal.  I also made more rounded bends at the contact areas to get smoother movement and to make more contact with the PC board.

On some of these the wire lugs that are riveted onto the board broke off with handling and others were about to so I cut them all off and soldered the wires directly onto the bord from the top side.  Any solder that came through to the bottom side needed to be filed smooth for the the board to fit correctly into the black plastic housing.  The contact pads on the board were polished with a fine steel wool.

A small amount of NO-OX is applied with a tooth pick to the contact areas of the PC board.


With the contacts and the black plastic piece in place, the PC board can be snapped into place by pressing it straight down into the housing.  Make sure the switch slides easily back and forth without catching and of course, re-test with an ohm meter.  


Saturday, October 14, 2023

Fall 2023 layout update

I was late with a summer update and here we are just over two months later with the fall layout update.  On the layout itself there has not been that much progress as I have been working on several other hobby related projects that have taken up much of my hobby time.

Here are a couple of things that have gotten done on the layout recently.  Fascia was added to the top of the upper helix.  This completes all of the fascia on the layout.


The tunnel portals for the Carlin tunnels have been completed.  The actual ones don't look just like this. I had to make some compromises in the space I have available.  With these two things finished the hillside can be started.  This hillside is where the scenery will end on the east end of the layout.


Last June I brought the Ntrak club's 20 ft staging yard home with me from the N Scale convention in Reno.  This set of modules is over 30 years old and the last time it received an overhaul was in 2009. Some of the issues I have been working on are a couple of broken turnouts, poor elecrical contacts, and missing track feeders.   Each of the four modules is 5 ft long.  Most of the work is being done on the two end modules and those are shown here set up in my train room.


Here is a close up of one of the ends.  Several of the rails were broken from the ties where this yard interfaces with other Ntrak modules and were being held in place with track nails and super glue.  I made up the same type of PC board ties that I have used in several places on the home layout to better secure them.


The goal is to have this staging yard ready for our next layout setup in early December.  

Sunday, October 8, 2023

What to do with all those pizza cutter wheels

Having a layout with code 55 track, I have been replacing the deeper flange wheels on freight cars with low profile ones with priority being given to cars that have car cards and are used in layout operations.  So it's no surprise that I have a pile of the "Pizza Cutter" type wheels in my parts box.  Recently I had been making up removable loads for some of my gondolas and thought that old railroad wheels could make a nice load.

I started by cutting wheels off their axles with my spue cutter.


For a base I used a scrap of thin sheet metal cut to fit inside a Micro-Trains 50 ft gondola.


Next I began gluing the cut off wheels with liquid plastic cement.  First layer was laid out flat then additional wheels were added to the first layer.  They were all placed with the outside part of the wheel pointed up.

Similar to how I did with the scrap loads and covered the load with acrylic oxide red paint being careful get it into all the cervices. 

This is the almost finished load in a gondola.  I say almost because I still want to dry brush and weather this old to make it more realistic.  


Tuesday, September 26, 2023

On the road again - Lake Cascade, ID

During our August RV trip we spent several days in the area of Lake Cascade, Idaho.  We had not originally intended to spend time in this area but changed our plans because of the smoke from several wildfires further north.   This ended up being a great area and an unexpected high point of our trip.  Right next to our camp site was the beginning of a paved trail along the Payette River. 


I knew that at one time there had been a Boise-Cascade lumber mill in this area which had closed in 2001.  This trail was not on the railroad right of way but this sign along the trail indicated some railroad tracks nearby so of course I had to explore.


I did eventually find the railroad tracks.  They appeared to not have been used in quite some time.  What I have read is that this section of track had originally been laid around 1914 by the Pacific and Idaho Northern Railroad then taken over by the Union Pacific in 1936.  UP had abandoned the section north of Lake Cascade in 1980 and sold off the southern section to a new Idaho Northern Railroad in 1993.


There did not appear to be anything left of the lumber mill but there were a couple of siding tracks and a wye.  I did notice that all of the turnouts appeared to be maintained and were locked, and that all of the grade crossing signs were still intact.


There was this one RR maintenance shed within the wye.  Inside were boxes and buckets of spikes, tie plates, etc.  The building itself looked as if could fall down at any time.  That is one leg of the wye behind the shed.


Near where the tracks ended I found this elevated passenger platform which made me think that there had been a tourist railroad here at one time.   I later found out there was a tourist railroad here between 1998 and 2016 called the Thunder Mountain Line Railroad.  It ran for 40 miles along the Payette River between Horseshoe Bend and Lake Cascade.  The main page of their website is still operating at thundermountainline.com.

I was able to walk up the ramp and inspect the interior of the station platform.  Still seemed in good shape.  Maybe there is hope that this tourist railroad might reopen some day.


Wednesday, September 13, 2023

On the road again - Cashmere, WA

During our August RV trip we spent some time in central Washington state.  We decided to visit a place called the Cashmere Museum and Pioneer Village.  The interior of the building was full exhibits about the history of the area of the native people that had lived there.


The outdoor area had a collection of original pioneer buildings that had been relocated from various locations around the area to create something of a village. 

A part of the outdoor portion of the museum was a nicely done exhibit dedicated to Great Northern Railroad artifacts.  Like the Pioneer Village, all of these artifacts had been relocated here from various locations.   The Great Northern line, now operated by BNSF is only a few hundred feet from the museum site across the Wenatchee River.  A short section of track had been laid along one side of the museum stie.  The center piece of this exhibit was Great Northern caboose X494.

Visitors could enter the interior of the caboose.  As seen in this photo, it was bare bones but well preserved.


Next to the track near the caboose is the original 1900 flag stop station for Mission, which was the town's name until 1940.

At one end of the track was this Great Northern section house.  This section house was relocated to the museum site from the town of Leavenworth, which is about 10 miles to the west and is where our camp site was.


This was another one of those pleasant surprises that we found in our travels.