Sunday, April 25, 2021

Kit bashing a specific type flat car

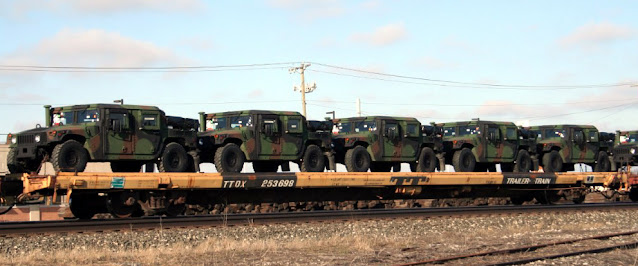
Not all of the flat cars carrying military equipment are owned by the Department of Defense (DODX).  Trailer Train has a number of 89 ft flat cars that are classified as type F226 and lettered TTDX that are used in this type of service.  I wanted to model a couple of these types to add to my train.


Years ago there was a hobby shop near San Francisco Airport called Trackside Trains.   Even though it was over 20 miles away I visited frequently.  At that time it seemed like undecorated Micro-Trains flat cars were a great deal compared to the decorated ones so every time I visited the shop if he had one I would buy it.  So I ended up with a good number of these and had only finished a few.  I am now using a couple of these for this project.


The molded on detail was removed from the deck and .040 x .040 Evergreen styrene strip was glued along both sides along the edge.


Two flat cars bodies were modified this way then airbrushed with Accuflex Trailer Train yellow which is glossy enough that I could add decals without a gloss coat first.   All of the decals came from Microscale set 60-578 except for the "TTDX" which came from the Gothic letter.   It is surprising how may decals can be used on a flat car and this took quite a bit of time but is one of my favorite parts of the hobby.  Afterwards the car bodies were sealed with Dulcoat lacquer.

In the top photo of 253698 there does not appear to be wood decks but I have seen photos of others that did and I liked the look of it so I added wood decks by adding 3 strips of .156 x .040 styrene strip that had been raked with a razor saw and then painted roof brown.  The spaces be along the edges and between the deck boards represent the chaining channels.


So next I need to finish some more HUMVEES, trucks, or other wheeled vehicles to populate these new cars.

Saturday, April 17, 2021

Securing equipment to a flat car

This is another installment in what will be a series of posts on my modeling of a military equipment train.  I was recently asked in a comment if I were going to chain these military vehicles to the car decks and what my technique was for doing that. 

The subject of this chain down is one of the Micro-Trains M1 Abrams tanks.  These kits come with some etched metal tie down chains but I found those to be too fiddly for me so I fell back on a method I used several years ago on another project and used the model chain from Clover House shown in the photo below.  I have used this same method on cast resin, 3D printed, and injection molded models.


I use a staple from a common desk stapler as a pin to hold the ends of the chains.  One end of the staple is cut short and bent at an angle then the end link of the chain is slipped over it as shown in the photo below.   Then the short end bent at an angle is pinched closed with a pair of needle nose pliers.  The long end is then cut off to a length of about 1/4 inch.


Using a pin vise with a .025 bit holes are drilled into the each side of the both of the body as shown in the photo below.  In the case of this model the body is hallow but if it is a solid body the hole should be at least 3/8 inch deep. 


The chain / staple assemblies are inserted into the body of the model and secured with a drop of CA (super glue).  Touch up the paint as necessary.

After all 4 of the chains are attached, the vehicle is attached to the flat car with a small amount of E6000 adhesive.  This adhesive will hold but can be removed if desired.  This M1 Abrams tank is actually slightly wider than the flat car so the E6000 is placed on the inner edge of the treads as shown in the photo below.

After the adhesive has set, the chains are pulled out across one another as shown in the photo below.  The chains are cut so that the last link is in line with one of the tie down tracks on the flat car deck.  A .025 hole is drilled at this spot and the other half of the staple is inserted through the chain link and into the hole.  This is then secured with a drop of CA.


After the CA has set the paint is touched up on the deck, the chains, and the pins as needed.  Here is the completed car on the layout.


Saturday, April 10, 2021

Woodland Scenics barbed wire fence

The area around the Palisade tunnels is one of the more photographed spots on the prototype.  I suspect this is because a road called the Palisade Ranch Road goes right over the tunnel portals.  In some of the photos I have seen there is a barbed wire fence on wooden posts along the side of the road.  I have pointed out the path of the road and this fence in the photo below.

As I have included the road on this area of my layout I also wanted to include the fence. The other barbed wire fence that I have used on the layout at Weso has what appears to be steel poles and I can't find any more of that anyway so I decided I would try out the new Woodland Scenics barbed wire fence.


The kit includes one section of fence which is about 12 - 1/2 long, two small gate sections, and several extra posts with some having diagonal bracing.  My project needed about 18 inches of fence so I ended up buying two kits.   The poles are plastic and the wire is some sort of thread.

I basically followed the instructions included in the kit.  Starting from the back I planted the first post and secured it with CA (super glue).  After that dried I made a tool from an alligator clip and a paper clip that would hold the other end so I could make holes for the rest of the posts.  I set the 2 to 3 at a time.   There are no corners or gates so I did not use any of the extra poles.  Depending on the alignment of the posts, some of the threads are not uniformly tight but that's OK with an old fence.   I did break one bottom thread but was able to re-attach it to the post with a drop of CA.

I am happy with the result.  After studying this new photo it looks like I could add some rock outcroppings and more brush to my scene.  I have also been wanting to try out some static grass and this might be an area I could do that.  At first I thought this kit rather expensive but it's actually about the same as the other barbed wire fencing I was using and this one fits the prototype better.  I have some left over that I may install somewhere else on the layout in the future as there are plenty of places on the prototype that have this type of fence.


Thursday, April 1, 2021

Video - Westbound SP TOFC Palisade to Weso

I recently put up a new layout video on YouTube.   This one follows a Southern Pacific TOFC train between the Palisade tunnels and the west end of the paired track at Weso, just east of Winnemucca.  The era for this video would be in the early 1990's.

 https://www.youtube.com/watch?v=sljcpPF6VlE