Tuesday, October 24, 2023

Rebuilding Peco PL13 switch contacts

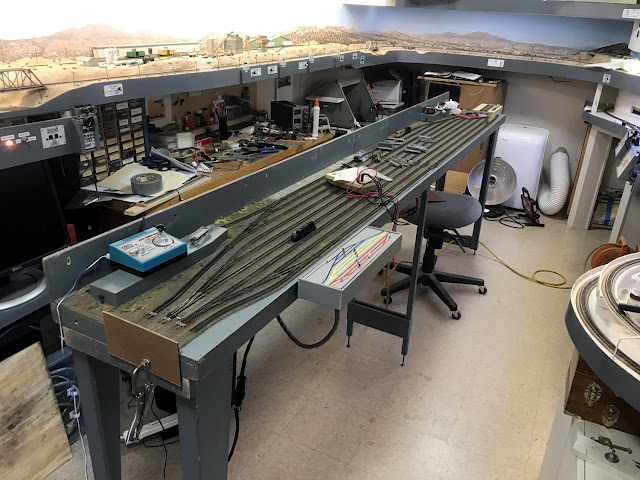
I have been working on a major side project.  I am doing an overhaul of the Ntrak club's 20 ft long staging yard.  Specifically, trying to correct the problem we have been having with getting the voltages to switch between tracks on the yellow and blue Ntrak lines.

This yard uses Peco solenoids to move the turnout points and separate solenoids with the PL13 switch contacts to route the power to each of the yard tracks.  Checking with an ohm meter these contacts were only intermittently making contact, making high resistance contact, and sometimes no contact at all.  No wonder we were having problems.


As these devices are widely used and rather expensive to replace, I thought it would be a good topic to present here what I have done to rebuild some of these that were not working correctly.

The PC board can be separated from the black plastic housing by pushing with a small flat blade screwdriver through one of the openings on either end of the housing.


Once the board was removed from the housing it could be seen that the contact areas of the board had become oxidized and worn.  Also, the two wiper parts bent at different angles, so it is likely one of them was not making good contact with the board.

I bent both contacts up at a sharper angle and tried to make that angle equal.  I also made more rounded bends at the contact areas to get smoother movement and to make more contact with the PC board.

On some of these the wire lugs that are riveted onto the board broke off with handling and others were about to so I cut them all off and soldered the wires directly onto the bord from the top side.  Any solder that came through to the bottom side needed to be filed smooth for the the board to fit correctly into the black plastic housing.  The contact pads on the board were polished with a fine steel wool.

A small amount of NO-OX is applied with a tooth pick to the contact areas of the PC board.


With the contacts and the black plastic piece in place, the PC board can be snapped into place by pressing it straight down into the housing.  Make sure the switch slides easily back and forth without catching and of course, re-test with an ohm meter.  


Saturday, October 14, 2023

Fall 2023 layout update

I was late with a summer update and here we are just over two months later with the fall layout update.  On the layout itself there has not been that much progress as I have been working on several other hobby related projects that have taken up much of my hobby time.

Here are a couple of things that have gotten done on the layout recently.  Fascia was added to the top of the upper helix.  This completes all of the fascia on the layout.


The tunnel portals for the Carlin tunnels have been completed.  The actual ones don't look just like this. I had to make some compromises in the space I have available.  With these two things finished the hillside can be started.  This hillside is where the scenery will end on the east end of the layout.


Last June I brought the Ntrak club's 20 ft staging yard home with me from the N Scale convention in Reno.  This set of modules is over 30 years old and the last time it received an overhaul was in 2009. Some of the issues I have been working on are a couple of broken turnouts, poor elecrical contacts, and missing track feeders.   Each of the four modules is 5 ft long.  Most of the work is being done on the two end modules and those are shown here set up in my train room.


Here is a close up of one of the ends.  Several of the rails were broken from the ties where this yard interfaces with other Ntrak modules and were being held in place with track nails and super glue.  I made up the same type of PC board ties that I have used in several places on the home layout to better secure them.


The goal is to have this staging yard ready for our next layout setup in early December.  

Sunday, October 8, 2023

What to do with all those pizza cutter wheels

Having a layout with code 55 track, I have been replacing the deeper flange wheels on freight cars with low profile ones with priority being given to cars that have car cards and are used in layout operations.  So it's no surprise that I have a pile of the "Pizza Cutter" type wheels in my parts box.  Recently I had been making up removable loads for some of my gondolas and thought that old railroad wheels could make a nice load.

I started by cutting wheels off their axles with my spue cutter.


For a base I used a scrap of thin sheet metal cut to fit inside a Micro-Trains 50 ft gondola.


Next I began gluing the cut off wheels with liquid plastic cement.  First layer was laid out flat then additional wheels were added to the first layer.  They were all placed with the outside part of the wheel pointed up.

Similar to how I did with the scrap loads and covered the load with acrylic oxide red paint being careful get it into all the cervices. 

This is the almost finished load in a gondola.  I say almost because I still want to dry brush and weather this old to make it more realistic.