Thursday, December 30, 2021

Progress on Carlin yard

Carlin yard has been slowly but steadily progressing.  Additional turnouts had to be made for the spur tracks that will come off the siding along the front of the scene.  Now work has begun to lay that siding with the turnouts.


While assembling this section of track I have been using a little tool that I made up a while back that I thought would be worth sharing here. This tool has been making the handling of the rail joiners much easier for me.  

Starting with the small screwdriver that comes in one of those eyeglass repair kits I cut off the flat blade end.  A scrap of code 55 rail was soldered into a scrap of square brass tubing of a size that both the rail and screwdriver would slip into.  Then the other end of the tube was glued onto the screwdriver with ACC.  I also filed the end of the rail just a bit to make it easier for a rail joiner to slip onto.


It’s easy to get the rail joiner onto the tool and then use this to hold the rail joiner while pushing it onto the track rail.  I keep this tool in the same small zip lock bag that I keep my rail joiner in.  This idea could also work with other codes of rail and other scales.

This will be the last post for 2021.   Wishing everyone a happy new year holiday.

Sunday, December 5, 2021

Another new Youtube video

Recently I created a new video that features most of my Southern Pacific collection.  This gave me a chance to run some things that I have that are outside of the layout's modeled era.   The idea came from seeing a Youtube video of a commercial produced by the Southern Pacific in the 1980's and then finding a few other videos using the same music and featuring HO scale layouts.  So I thought there should be an N scale version and here it is, enjoy.


Sunday, November 21, 2021

Starting the Carlin section

Work has begun on the Carlin section of the layout which is about 11 feet long and will be above the staging yard.  I have not been great about making drawings for most of the layout but as I will need a control panel for this area I do at least have the graphic for that panel below which will be used to create display panel.  I call it a display panel because all but one of the turnouts are going to be controlled with push-pull rods with LEDs on this panel showing the status of the turnouts. 


In the steam era Carlin had lots of railroad facilities but that had been cut way back by the 1970's and even more so after the UP merger.  In the era that I model, Carlin was still a crew change point on the Southern Pacific as it was half way between Sparks and Ogden.   Crews based at those terminals would stay here for the required rest period before taking another train for the return trip home.   The Western Pacific line passes through on the other side of town so there were cross overs so eastbound SP trains using that line could come into the SP yard then return after crew change and servicing.

A local originated from here so a road switcher and a switcher will be stationed here as well.  There are a few industries just to the east of town but since I don't have the length to do it that way they will be represented along the front edge.

As I have done in the past, this section is being worked on in the middle of the room sitting on saw horses.  Here is a recent shot of the east end of the yard.  When track laying is completed the section can be set up on it's back edge to make the turnout controls and wiring much easier to install. 


Thursday, October 21, 2021

Last crossings of the Humboldt River

In my last post I showed how I was working on the track plan for the Carlin section of the layout.  This will be about 11 feet long spanning 2 sections of bench work and will be the last part of the layout to have scenery.   The Southern Pacific / west bound track will make one last pass over the Humboldt river on this layout after emerging from the tunnels.   This is shown in the photo below from Google maps with the SP track being the one on the left.  Notice how the track on the right which is the Western Pacific / east bound track remains on one side of the river.  It does not cross the river until the track is almost to Carlin a couple miles away.

Here is view of the area where a cross over track connects from the WP track over the the SP track.  This was put in so that an east bound SP train can enter the SP yard for crew changes and I suppose fuel as well.  Both the WP track and the crossover track cross the river at this point.


Of course in the model world we most often have to compress our scenes.  So on my layout all three tracks will cross the river on the smaller of the two Carlin sections.  The river has been cut into the deck of this section and a box structure was built to support the river bed.  The bridge on the SP line is going to be the Micron Arts bridge featured in this post from last June.   The bridges for the two crossing toward the rear are to be determined but will be understated as I want the Micron Arts bridge to be the focal point of the scene.


Monday, October 11, 2021

Another October update

I know I have not been posting much but I have been working on and operating the layout.  Most of this work has been directed toward getting ready for the next layout expansion.   The two Carlin sections have been taken down from their temporary use as a turn around loop and a new tempoary turn around loop installed.  

With the Carlin sections down on saw horses a full sized track plan of the Carlin section has been done on a roll of red rosin paper similar to what I did with the Palisade Ranch section about a year ago. With an idea of how many turnouts will be needed, I have been building more code 55 turnouts with my FastTracks jigs.

This October will mark 7 years since I started the layout in 2014.

Still no train shows in my part of the world so the modules for display layouts remain in storage and I continue to devote all my model building time to the construction and operation of this layout.

Friday, August 27, 2021

New DC test track


Since late 2019 I have had no DC test track.  This layout, using DCC circuit breakers is DCC only except for running a DC loco on address 00.  This has not been an issue as most of my needs for testing DC equipment is prior to a show and there just hasn't been any since the pandemic started.  I have thought of making a DC test track that would slide out like a drawer from under some part of the layout or hinge up or down.  Then recently I had a need for a DC test track when a friend asked me to repair one of his DC locomotives.  So I looked around my shop and using a scrap of peg board, some stiffing rails and a few C clamps threw together the setup seen below.


After finishing the loco repair I realized that I had been overthinking the design and had a good solution right in front of me.  The peg board got cut down to 24" X 30".  Then the railing material was cut to size to frame the edges of the peg board.  A groove was cut lengthwise on the inside edge for the peg board to slip into and the pieces were glued together.   This made for a sturdy enough board that could be placed on a box, or as in the photo below on a pair of modules in storage.


The Kato power pack I am using for this test track will be stored seperately so it is not attached to the board.  A frame of strips glued to the board will keep it from sliding around.  One hole was enlarged on the board to be big enough for the adapter plug to feed through and the track connector comes through another hole.


That wire to the track is secured to the bottom board by feeding it through a tube that is held to the board with adhesive.


When not in use, the test track fits along part of the short wall that the supports the helix.


Sunday, August 22, 2021

Near disaster in the canyon

Awhile back I had been switching the trains over the from the 1989-1996 to the 1975-1982 era, running each new train around the layout as I did.  The U30C / U25B consist was westbound on the SP line when the U30C derailed on the curve in the most recently completed area of the layout coming to rest near the steel viaduct and almost fell off the edge of the world.


After a bit of testing I was able to determine that the inside rail in that curve had a spot where it dipped rather abruptly.  I used a set of trucks on an empty frame that would freely roll to see exactly where the derailment was starting and then confirmed the dip with a small bubble level.  This was all checked when I laid the track and it was on then.   I suspect that while finishing some of the scenery toward the rear of this area I must have placed some of my weight on the track near the front edge.  The rail was not bent, just pushed down in relation to the rear rail.  The U30C is one of the locomotives that I had installed low profile wheels on and the shallower flange slipped out over the dipped section of the rail more easily than a deep flange would have.

The problem was solved by soaking the area with water to soften the glue and ballast, then raising the outside rail and placing a shim of .010 styrene strip under the ties. 

The ballast was touched up and the area again re-soaked with a 50/50 white glue / water solution.   A re-check of the entire area with my small bubble level showed everything was now within tolerance. 


Friday, July 23, 2021

Expanding the signaling

Over the summer I have been adding several new searchlight signals to the layout.  Track gaps were cut on the Western Pacific line near the Humboldt River rapids and on the Southern Pacific line between the skewed bridge and the viaduct.  Four more single target searchlight signals were built to provide coverage in both directions on both lines.  I have now made 6 of the single target signals and they go fairly quickly now.

 On the Western Pacific line at the Humboldt River rapids


And on the Southern Pacific line


These additional blocks required a new pair of NCE BD20 sensors along with some low current relays to control the signals.  This is located under the staging yard near the PSX circuit breakers for these blocks.


With these additional signals both main lines are covered from Winnemucca to the Palisade tunnels.  I still need to work on the intermediate signals around Battle Mountain and Weso that will indicate turnout positions.

Saturday, June 26, 2021

Techinque for painting lococomotive handrails.

Most railroad have had a practice of painting the handrails of their locomotives and cabooses in a contrasting color as a safety measure.   Sometimes this practice is extended to the edges of the steps.  SP and UP used white Many of the older Kato and Kato made Atlas locomotives I have on the layout did not come with painted handrails. 

On these models the handrails and walkways are a separate assembly that is made of a durable and smooth plastic a little different than the other components.  It is easier to paint the handrails with this assembly removed.

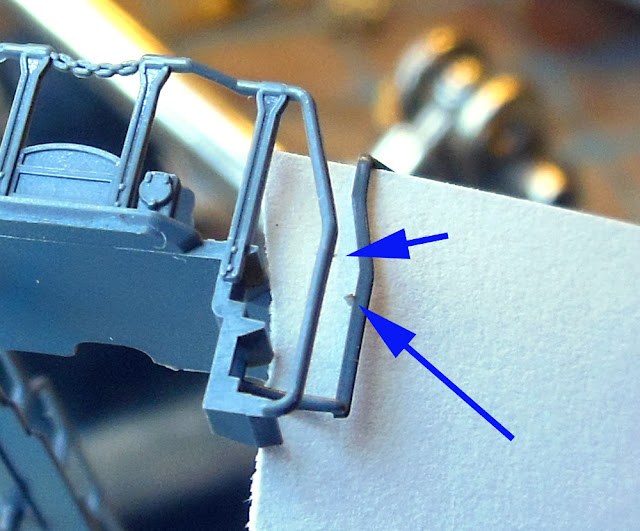
On some of these models it is not uncommon to find a bit of flash on the handrails.  Referring to the photo below, it is not very noticeable in the basic gray color so I placed a bit of white paper behind it.   Once the handrails are painted, the flash is more noticeable so it's best to remove it before painting.  These small flashes can be removed with a sharp Exacto blade.  After this I give the assembly a good washing with warm water and dish soap using an old toothbrush and then letting it dry before painting.   


That durable and smooth plastic of the handrails does not stick to paint very well.  Over the years I have tried several brands and types of paint and ended up having the best results from Testors Practa Racing Finish Enamel.  This is made for R/C car bodies which are made of a flexible plastic.   Even using this paint some of the paint would flake off the handrails over time with handling the models.


Recently I had read about some modelers using spray adhesion promoters to get better results when painting such plastics.  Not finding any product like this at my local hardware store, I ordered the product shown below from Amazon.  It is clear so masking of the handrail assembly was not necessary. 

After some practice I learned the trick to using this product is to spray the hand rails at one end then let it dry to the touch, about 3-4 minutes.  Then paint the hand rails with the top coat within 10 minutes.


I have now done 5 locomotives this way with some of those shown in the photo below.  This technique is getting me the best results yet.  Over time I may go back and redo some of the others with this new technique.


Thursday, June 17, 2021

Making the lift gate more visible

The lift gate across the entry doorway to the train room is about chest height on me from inside the room and about neck height when entering the room because of the ramped entry.  One day my wife came looking for me in the train room and did not notice the lowered gate and hit her head on it.  Both she and the gate were OK but it became a priority to make the gate more visible.

The first step was to visit the local hardware store and purchase 2 packages of this reflective tape shown on the left.

The tape is 2 inches wide and 24 inches long.  This was just right to fit along the edge of the gate on both sides.


On the same trip to the hardware store I found some 1/2 inch aluminum channel.  I used this channel to mount bright red LED's on each side of the gate.  These LED's turn on whenever the gate is in the lowered position.   Part of the channel and how the connections are made under the gate are shown in the photo below.


So this is what the gate looks like now when entering the train room.   The multi pair cable seen on the right end of the gate is for the LED's


At around the same time the gate interlock circuit stopped working.  What had happened was that when the magnetic switch on the gate opened when the gate opened, the collapsing magnetic fields on the 5 automotive relays were sending a surge of voltage back to the switch contacts until they burnt out.  The common practice to have a diode across the relay coil to prevent this.  I normally do this on my PC board mounted relays but neglected to add it this time.  Surprised I got away with it as long as I had.  So the automotive relays got replaced with some relay modules that are designed to interface with the outputs of Arduino micro controllers and have isolation circuits on their inputs so should not have any more problems.  These were mounted on the same board under the Palisade Ranch area that the automotive relays had been.  Referring to the photo below the set of 4 on the right control the DCC connection to the tracks on the gate and it's approaches, one for each rail.  One relay in the set of 2 on the left are for the LED's on the gate.


Saturday, June 12, 2021

A new layout video

I recently added a new video of the layout to my YouTube channel.  This one is a tour of the Western Pacific or eastbound paired track following a manifest freight past several scenic locations.

https://www.youtube.com/watch?v=epczlIs0zFk&t=6s


Sunday, June 6, 2021

One more bridge

There are already 6 through truss bridges on the layout but I will be adding one more in the next expansion of the layout.  This one will represent the bridge that was on the Southern Pacific line on the east side of the Palisade tunnels which served the line for more than 100 years but was demolished by a derailment in 2008.


For this bridge I choose to use the brass kit from Micron Arts.  I have only done small brass kits up to the point and this by far will be the most complex one I tried.   I've had this kit stashed away for some time and honestly have been a little intimidated by it's complexity.


The most difficult part seemed to be the first step of the kit assembly.  I found that adding the webbing to the vertical uprights to be quite challenging.  After trying both soldering a gluing these and destroying some of the webbing parts I gave up and decided to leave the webbing out.  I cleaned up the solid parts of the vertical uprights and pressed on and then things went together more smoothly.


Taking my time in building this kit it still went surprising fast.  I was soldering most of the parts and did not have to wait for any glue to dry.  The finished assembly was quite strong and sat squarely on it bridge shoes.  In the photo below it is placed in about the location where it will eventually be installed.

Somewhere I read that brass models should be soaked / washed in vinegar before painting to slightly etch the surface so the paint will adhere better.  I let this soak for several hours and also used an old toothbrush to wash away any solder flux that might be left in the corners.  After the vinegar soak the model was rinsed and left to dry overnight.


Lately I have been trying out some paints from Mission Models and like them.  Using my airbrush I first applied two coats of their gray primer.  The coverage was fine but it took 2 coats to get all the different angles of all the parts.


After letting the primer dry overnight, I gave the model 2 coats of what Mission Models calls tire black which is a flat black.


Now being finished except for some weathering, this will be put away until construction starts on the next expansion.  I don't expect that to happen until winter at the soonest.  The kit came with a section of code 55 bridge track the same length as the bridge.  I won't use this as I like to use a longer section and replace the bridge ties on both ends with standard ties so the joints are well clear of the bridge ends.

Sunday, April 25, 2021

Kit bashing a specific type flat car

Not all of the flat cars carrying military equipment are owned by the Department of Defense (DODX).  Trailer Train has a number of 89 ft flat cars that are classified as type F226 and lettered TTDX that are used in this type of service.  I wanted to model a couple of these types to add to my train.


Years ago there was a hobby shop near San Francisco Airport called Trackside Trains.   Even though it was over 20 miles away I visited frequently.  At that time it seemed like undecorated Micro-Trains flat cars were a great deal compared to the decorated ones so every time I visited the shop if he had one I would buy it.  So I ended up with a good number of these and had only finished a few.  I am now using a couple of these for this project.


The molded on detail was removed from the deck and .040 x .040 Evergreen styrene strip was glued along both sides along the edge.


Two flat cars bodies were modified this way then airbrushed with Accuflex Trailer Train yellow which is glossy enough that I could add decals without a gloss coat first.   All of the decals came from Microscale set 60-578 except for the "TTDX" which came from the Gothic letter.   It is surprising how may decals can be used on a flat car and this took quite a bit of time but is one of my favorite parts of the hobby.  Afterwards the car bodies were sealed with Dulcoat lacquer.

In the top photo of 253698 there does not appear to be wood decks but I have seen photos of others that did and I liked the look of it so I added wood decks by adding 3 strips of .156 x .040 styrene strip that had been raked with a razor saw and then painted roof brown.  The spaces be along the edges and between the deck boards represent the chaining channels.


So next I need to finish some more HUMVEES, trucks, or other wheeled vehicles to populate these new cars.


Saturday, April 17, 2021

Securing equipment to a flat car

This is another installment in what will be a series of posts on my modeling of a military equipment train.  I was recently asked in a comment if I were going to chain these military vehicles to the car decks and what my technique was for doing that. 

The subject of this chain down is one of the Micro-Trains M1 Abrams tanks.  These kits come with some etched metal tie down chains but I found those to be too fiddly for me so I fell back on a method I used several years ago on another project and used the model chain from Clover House shown in the photo below.  I have used this same method on cast resin, 3D printed, and injection molded models.


I use a staple from a common desk stapler as a pin to hold the ends of the chains.  One end of the staple is cut short and bent at an angle then the end link of the chain is slipped over it as shown in the photo below.   Then the short end bent at an angle is pinched closed with a pair of needle nose pliers.  The long end is then cut off to a length of about 1/4 inch.


Using a pin vise with a .025 bit holes are drilled into the each side of the both of the body as shown in the photo below.  In the case of this model the body is hallow but if it is a solid body the hole should be at least 3/8 inch deep. 


The chain / staple assemblies are inserted into the body of the model and secured with a drop of CA (super glue).  Touch up the paint as necessary.

After all 4 of the chains are attached, the vehicle is attached to the flat car with a small amount of E6000 adhesive.  This adhesive will hold but can be removed if desired.  This M1 Abrams tank is actually slightly wider than the flat car so the E6000 is placed on the inner edge of the treads as shown in the photo below.

After the adhesive has set, the chains are pulled out across one another as shown in the photo below.  The chains are cut so that the last link is in line with one of the tie down tracks on the flat car deck.  A .025 hole is drilled at this spot and the other half of the staple is inserted through the chain link and into the hole.  This is then secured with a drop of CA.


After the CA has set the paint is touched up on the deck, the chains, and the pins as needed.  Here is the completed car on the layout.