Thursday, September 7, 2023

Scrap yard fencing

I have been continuing work on the scarp yard in Carlin and wanted to create some fencing similar to what I had seen around such places. I started with some corrugated foil material that I have used to make roofs on some structures.  A little package of this material was my first ebay purchase back in 2001 and has been used on several projects over the years.  This material was cut into 10 scale feet high strips.  The one shown in the upper right of this photo is how shiny it is so I painted them a duller aluminum color and dry brushed some weathering on them.


Coiled razor wire at the top of the fence was made by winding 30 gauge magnet wire around a bamboo skewer.  This was then painted a silver color before being attached to the top cross frame of the fence with Super glue.


I built frames for the fence from .030 x .030 styrene strip painted roof brown before attaching the simulated metal sheeting.  This photo shows this in the section that has the gate for the track.


The foil material was then attached to the frame with tiny dots of E6000 adhesive using a bamboo skewer.  The foil material is nonconductive and since the frame is made from styrene, there is no chance of shorting the rails.


The gate is supported by a single pin at one end that is not glued into the base so the gate can swing open.  The spacing was set so that freight cars and locomotives can pass through without hitting the fence.


Still plenty more to do to finish this scrap yard.  More in future posts.


Sunday, September 3, 2023

On the road again - near Terrebonne, OR

 In August my wife and I did a 2 week long trip with our travel trailer to the Pacific Northwest.  On the second day of the trip we were north bound on US 97 north of Bend, Oregon when we decided to pull into a highway rest stop.  We soon discovered that we had entered a historically important site.  

We discovered that US 97 and the parallel railroad track were about to cross a rather deep gorge and the Crooked River.  This large rest stop is known as the Peter Skene Odgen State Scenic Viewpoint.  I was not familiar with this river so had to stroll around the site and check things out.  


The arched rail bridge was originally built for the Oregon Trunk Railroad around 1911 and apparently still in use today by the BNSF although we did not see a train pass while we were there.


The site also includes the old 2 lane US 97 bridge which was built in 1926.  It is in the foreground in this photo and it's wider replacement built in the 1990's is in the background. 


While the old highway bridge is not open to vehicle traffic, it is open to pedestrians and connected to the park. Visitors can walk out to get a different view of the gorge.


Monday, August 7, 2023

Summer 2023 layout update

Summers always go by so quickly and summer 2023 especially so.  

With the pandemic now seemingly behind us, my wife and I have been trying to make up for lost time in regards to travel.  Earlier this year we spent a month Japan, then in April spent a few days in Santa Rosa, CA, and then in June attended the N Scale convention in Reno, NV.  We still plan to get in a longer RV trip before the summer is over and then a trip to the eastern US in the fall.

Not so much has been happening as far as construction progress on the layout.  I have been enjoying operating the layout regularly by myself and have been continuing to develop the operations.   I've also been doing some small projects which have been presented here.

I have also taken on a couple of hobby related projects outside of this layout.  First is the design and building of a control system for a pair of 5 track staging yards that are part of a friend's large N Scale, DC controlled double track layout.  These are the control panels that I have built for this project.  They are built using the same methods as I have used for the control panels on my layout.   The painter's tape around the edges is to keep any debris from getting in between the layers and will be removed just before installation.


The track power control circuits that were removed from my layout have been modified to control the turnouts on this project.  I have also built a pair of new diode matrix boards to match this yard's track plan.  

I came home from the N Scale convention with the Ntrak club's 30-year-old, 20 ft staging yard which is in need of an overhaul.  The main part of the project will be to change the electrical track selection from using the Peco contacts to some sealed relays.  This was done on the red line during the last overhaul in 2011 and eliminated any voltage drops on that line. So this time this will be done on the yellow and blue lines.  Then there are a few other minor repairs to make and my deadline for this is early December when we have our next setup.  This is that yard in it's storage configuration along with it's legs sitting under part of the layout.  It's 20 ft long overall in four 5 foot sections.  All of the work to be done is on the 2 end sections and those can be set up in the middle of my train room.


So through the rest of this year, most of the time spent in the train room will be spent on electronics work but I can still do plenty of running on the layout and may even sneak in a few more small layout projects too.

Tuesday, August 1, 2023

Patching a patch job

During the N Scale convention held in Reno in June, Scaletrains sent out their PS-2 4785 3 bay covered hopper painted for Golden West Service and patched for Cotton Belt (SSW) to everyone who attended the manufacturers breakfast on Sunday morning.  What a nice surprise that was.  Because my wife also attended, we received two of these models with the same number so I wanted to re-number one of them.


I always like to start with a prototype photo and so looked through a bunch online.  The patches on these cars were done in several different ways.  I settled on this one although it is less weathered than the model.  While the stock Scaletrains model has a dark blue background with yellow characters, this one appears to have a black background with white characters.

.

First thing to do was to remove the original patch.  I found that with a soaking of Microscale Micro Sol and gentle scraping with an Xacto blade, the original patch comes off fairly easily.

For the black background I used some of the wider stripes from a black stripe set I had.  None of the stripes were wide enough so I doubled the rows to get the width I needed.


This is the area with the black stripes applied.  The black stripe decals were applied in between bunt not over the panel seam to match the prototype photo.  These were then given an application of Micro Sol before the characters were started. 


This is how the model looked after the characters were applied.  As the weathering on these cars was identical, I added just a bit more to this one to make them seem different.  This was a fun project.  Most prototype patch jobs tend to be held to lower standards then original paint jobs so a few crooked decals or mismatched character fonts can be forgiven.  These are great models and I'm really happy to have them on my layout.


Thursday, July 20, 2023

Changes for the Western Pacific staging yard

The west end Western Pacific staging yard had been in limited operation as being just a return loop since March.  I had replaced the wye control function of the non-operating DS64 with my own circuit but still could not use 3 of the 4 tracks.  Recently I built and installed the circuit to control the yard ladder.


With the new controls, the control panel also got some changes.  In the old scheme the track selected LEDs used a common return.  With this new scheme each LED is connected to its own track on both rails so additional connections were needed.  Removing the unused occupied LEDs freed up those connections in the control panel.

As I always run the trains in the same direction in the staging yard, I replaced the toggle switches which had controlled both the yard ladder and wye turnout with push buttons.  Then push buttons were added for independent control of the wye.  Those changes are pointed out in blue in the photo below.


So now this staging yard works the same way as the lower level staging yard but without the automatic function.

Thursday, July 13, 2023

Removable coal loads for Micro-Trains hopper cars

Some time ago I added a unit coal train to the operation of my layout.  The SP trains would have been carrying Wyoming coal from Ogden, Utah to San Jose, California.  From there it would have gone out on locals to at least two cement quarries to be used it in their kilns. 

On this layout these trains run through without any interchange. It seemed unrealistic for them to run loaded in both directions so I wanted an easy way to remove these loads so they could be empty in the eastbound direction.  

The loads that come with the Micro-Trains hopper are good looking and fit snugly into the car and cannot be removed without picking up the car.  The loads weigh 10 grams, with the empty car weighing 18 grams so a lot of the weight is in the loads. On the bottom there are three rectangular bulges. 


First I wanted to make sure the empty cars would be not be too light and would run OK on the layout so I ran a train of 9 empty cars with several mechanical reefers on the back around the layout a few times and this seemed to work well.

I removed the center bulge with a coping saw then smoothed out the area with a sanding stick.  I originally thought those bulges might contain some metal weight but apparently it does not and the 10 grams is all plastic.  With one of the bulges removed, the load weighed in a 8 grams.


Using a sanding stick I sanded all of the outside edges until the load fit loose enough so that it fell out when the hopper car was turned upside down.  


Some 5/8 inch wide metal strip was cut into lengths.  The corners were rounded and the edges were filed smooth.


The metal strip was attached to the center area of the bottom of the load with E6000 adhesive and clamped until set.  The 2 grams lost with the removal of the center hump was made up with the addition of the metal strip and the load was back to its original weight of 10 grams.


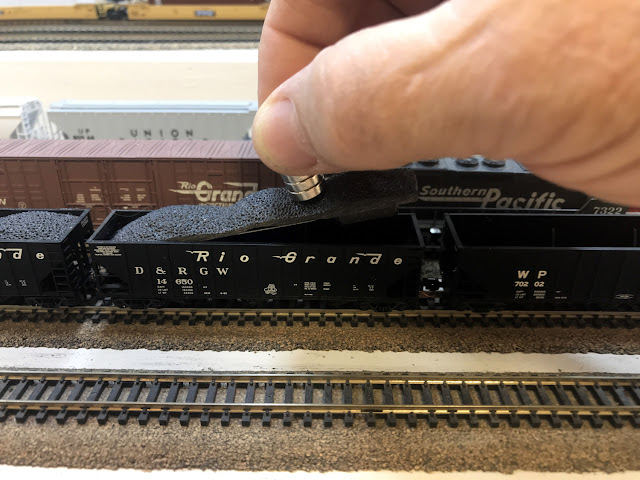
Now with the help of a magnet, the loads easily be removed when the west bound coal train reaches the west end staging yard. 


Saturday, July 8, 2023

The 2023 N Scale convention - Part 4

There was also a T-Trak layout at the 2023 N Scale convention.  Not nearly as big as ones I've heard about being at conventions in the east but was the first one of any size I've seen in person.

Below are some pictures of a few of the T-Trak modules showing what kind of scenery can be done in a small space.  Notice that the camera angle is more looking down.  That is because these modules are set on tables that are about 30 inches high.  These first two are single size which don't allow much length to include any turnouts.


This module appears to be a double sized which allows more length to include turnouts.


It was really great seeing 3 different modular layout standards side by side and to see the public interaction with each type of layout.  Here are some of my own observations.

FreemoN - Uses code 55 track which is what I use on my own home layout.  As the layout tends to be single track with multiple junctions and balloon tracks, not as many trains running so a viewer is likely to look more at the scenery and the scenery on this layout was realistic and very well done.  This layout type is great for serious modelers to run some realistic operations.  Also I believe these types of modules may be more easily integrated into a home layout.

T-Trak - The low height is great for viewing by children or for someone seated or in a wheelchair.  It's also a good way for children to get started in the hobby.  Uses Kato Unitrack which is also great for beginners. Someone could also use these modules as a home layout.  Uses double track as a standard so allows for more continuous operations during public display.  Personally, I don't like the low height but if used in a home layout could be set on shelves at any desired height. 

Ntrak - With 3 tracks and set at a 40 inch height this layout type can provide lots of action and seemed to draw the most attention from the visiting public.  Modules can get a bit harder to handle for older modelers but with some ingenuity this can be overcome.  Not as easy to be used in a home layout, I know this because years ago I tried it.


Monday, July 3, 2023

The 2023 N Scale convention - Part 3

 N Scale layouts at this convention included 3 Ntrak, a really large FreemoN, a T-Track, a Disneyland display, and a static vintage Lone Star layout.   As this was the first time I have ever seen a T-Trak layout of any size and the first really large FreemoN layout, I'm going to feature those here.

FreemoN:  I spent quite some time wandering around this layout late one evening enjoying the realistic scenery.  A few of the modules I recognized as being from the local group in the Bay Area but most of them came from other areas and were new to me.


The scene is from a module set that I recognized as being from the local group in the Bay Area.


I did not see all that many trains running on this layout but that could have been because it was after hours.  


Lots of the modules in this layout had some really well-done desert scenery.


This particular module of Afton Canyon I am sure I've seen in a magazine somewhere.  These are the same BLMA bridges as the one I have on my layout in the Palisade Canyon.


In the next post I'll show part of the T-Trak layout.

Monday, June 26, 2023

The 2023 N Scale convention - Part 2

This is the second installment in my posts about attending the recent N Scale convention in Reno, Nevada.  

Peninsula Ntrak was assigned a 26 ft x 38 ft space for our layout and we ended up using 26 ft x 32 ft.   7 Members of our group brought their modules to the convention plus we used our large club staging yard and 5 of the club's outside corners modules.  We also had several of our members there without modules and they provided extra help with setup, running, and tear down of the layout.


A couple months before the convention, one of our members who is really good with scenery took one of our 30 plus years old corner modules with it's original scenery home for a re-do.  Just before the convention she brought it over to my train room where we completed a few finishing touches.   A total of 6 different members contributed to this project.  Shown here are Julia Jackson and Paul Ingraham.

We displayed this refinished corner module for the first time in our layout at this convention. This photo provided by Mark St Clair.

The layout was setup and running by Thursday afternoon and ran through Saturday afternoon.  Peninsula Ntrak has the flexibility to run DC or DCC on any of the 3 basic Ntrak lines.  We ran this layout using DCC on the red and blue line and DC throttles on the yellow line.  I ran DCC with one train on Friday and another on Saturday.  This was my Saturday train passing through the staging yard on the red line.  It was one of many different trains run by club members and guest operators.  Photo by Mark St Clair.


On Saturday the show was open to the public from 9:00am to 3:30pm and drew a good crowd.   It was a bit of a rush to get everything taken down and packed up by 6:30pm for the convention banquet but we did it.


Next post I'll show something of some of the other layouts that were set up at the convention.