Tuesday, October 22, 2024

Fall 2024 update and layout 10th anniversary

Where did the summer go?  The older I get it seems like the summer months go by faster and faster. Most of what I've been doing on the layout has already been documented in previous posts. Throughout the summer I was working on the buildings for Carlin.

I recently had one turnout motor start acting up.  It is one that had been in operation at the far end of the WP staging yard for almost 9 years.  When I removed it, I could tell that this motor was from 1997 so this was it's 3rd layout.  It sounded like a gear had stripped so I replaced it.  Also had one point rail break loose on one of the hand laid turnouts and that was easily fixed.  I think it's the first one and I have been happy with how well they have held up.

Recently my friend Clif was over to return the throw tie fixture I had loaned him.  The throw tie fixture was something I made to help me make stronger throw ties for my fast tracks turnouts.  Link HERE to the post on that.  Clif took the idea a bit further and had PC board throw ties made and gave me a sheet of 32 of them.


The timing of Clif's gift of throw ties was great as I am considering an expansion of the layout and will need to build several more turnouts.  Just in the early planning stage of this and I'll post more details as they develop.  Another change I am considering is to convert the existing area along the front edge of Carlin into a general transload facility.  Right now it just handles chemical tank cars and I would like to be able to have a greater variety of freight cars in use on the layout.  The area would be extended over the control panel housing as shown with the blue outline in the photo below.


This month marks the 10th anniversary of the start of the layout.  I started the layout room the year before that shortly after retirement.  At that time, I thought if I got 10 years out of the layout I would be happy.  There was always the possibility that my wife and I would decide to move after retirement but we are still here and don't really have any plans to leave.  I have been happy with this layout and amazed at how far it's gotten.  But I'm not done yet as there are still more things I want to do with it and of course there is always something that needs fixing.

Sunday, October 13, 2024

A gas station for Carlin - Part 4

It has taken over a month but this is the 4th and final installment on this project.  It has been an enjoyable project and I have taken my time with it. Being satisfied with the interior details, I installed the roof decking and the roll roofing material that came with the kit.   After the roofing material was installed, I painted it a dark green.


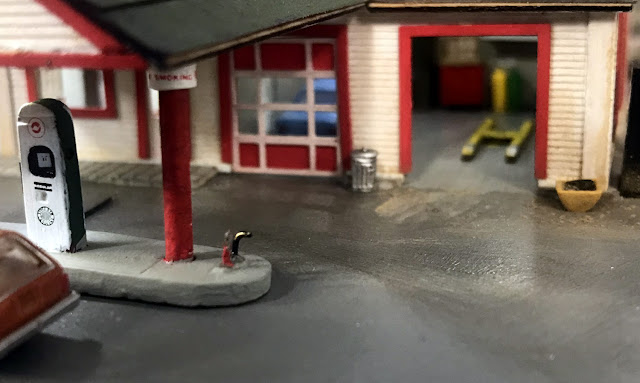
I did some more work on the pump island, adding water and air hoses made from .020 brass wire on each end. No smoking decals were added the posts, and more details with paint and decals were added to the pumps. 

One of the things I remembered about the gas station I worked at in high school was the tub of water they had to find the leak in a tire so I included something like that seen here as the yellow tub at the corner of the building next to the Coke machine.  I also added the hoses that would ring a bell whenever a car rolled over them.  Those were done with some small black wire.

The roof over the pumps was just large enough to mount the large Sinclair signs that came with the decal set.  The roof got some plumbing vents over the rest rooms and a TV antenna.  The exterior walls got a light weathering using brown detail wash and the roof got a light dusting with weathering powders. 


The sign on the pole is made from decals that came with the set.  The sign with the prices was made as a paper sign printed out from the computer and glued to a scrap of styrene.  The prices are about what I remember paying in the mid to late 70's before they just about doubled in 1979.


So with the completion of the gas station, all of the structures along Main Street have been finished.  There will always be little things that can be added and there are still things I want to do with the rail yard.


Sunday, October 6, 2024

A gas station for Carlin - Part 3

Welcome to part 3 of this saga of me building a gas station.  The summer between my junior and senior year of high school, I worked just about full time at a gas station so I am drawing on my memories of that summer to add details to this gas station scene taking advantage of the height of the layout and viewing angle.

My plan is to have at least one of the garage doors open and to light and detail the interior of the garage.  Some of the details seen this this photo such as the tool chests, locker, compressor, and tire rack are scratch built from scraps of styrene. The lift, tanks, and the floor jack are details left over from other kits.


The office area of the building is also getting some interior details.  The chairs are from a Faller set and the remaining furniture is cobbled together from scraps of styrene shown here before being painted.  The bathroom area will not be seen and will serve as the place for the wires that power the lighting to go through.


When I add lighting to buildings, I often use left over locomotive LED boards from the many DCC installations I have done.  In this case, I am using the just the boards replacing the original LEDs and resistors to get just the right amount of lighting.  Surface mount LED's are being used because of their small size.  The garage gets two LEDs mounted on a scrap left over from a kit.  This assembly will rest on small blocks attached near the tops of the walls.  One of these is visible in the upper right hand corner in the photo above.


Here are all the assemblies with the lighting now added to the structure and viewed from the bottom.  With the stiffer 22 gauge wire going through the hole in the bench work I decided to add a small magnet in the bathroom section that will mate with a washer on the floor to stabilize the structure within the perimeter.

And here is the structure assembly set in it's place before the roof sections were added.  The small 30 gauge decoder wires are soldered to the PC board in the upper left corner of this photo and that board has a pair of 22 gauge wires that will connect to 12 volt DC power under the bench work.


And here is the effect of the interior lighting.  The pump island has now also been finished and glued to the base.  Next will be installing the roof and this project will be almost finished.