Wednesday, February 3, 2021

A different finish for concrete

As mentioned in the last post on January 26th, I did something a little different to finish the bridge abutments for the Palisade Ranch area.  I have never been really happy with the look of my concrete surfaces and have been experimenting with different colors and techniques.  I ordered just about every shade of light gray Model Master acrylic that I did not already have and settled on # 4762 Light Ghost Gray (F) as a base color.   The tunnel portals were also repainted in this color and one of them is shown below.

I saw in a Youtube video someone using a technique of splattering tiny drops of white and black paint onto a surface to give the appearance of the aggregate that can show up in a concrete surface.  So I gave it a tray.  It took some practice and some time but I found the results to be satisfying.  Besides white and black I also added some darker shades of gray and some brown.   One of the finished bridge abutments is shown in the photo below.

After some weathering with acrylic washes the same bridge abutment looks like this and I am ready to install it on the layout.  Once it is locked into the right position I cover it with painters tape to protect it while I am adding scenery materials around it.


And here is that same bridge abutment after being installed and scenery material worked around it. 


Sunday, January 24, 2021

Palisade Ranch is shaping up

It's been a few posts since I have directly mentioned any progress on the current layout expansion and a lot has been done since then so I thought it was time for an update.    Almost all of the land forms along about 4-1/2 linear feet of the layout under construction have been completed.  The building of the mountain side that the tunnels go into will be done after the track has been installed and tested.

Bridge abutments have been made and installed for the two bridges near the Palisade Tunnels.   I did something a little different in finishing these bridge abutments and the details of that will be in a future post. 


Much of the scenery along the back edge of the area is almost done and the concrete trestle has been installed.   The front edge will have to wait until I can get some more tempered hard board for the fascia. 


The track assemblies for both those bridges have been finished.  The bridge in the photo below will have Micro Engineering bridge track with guard rails.  The other bridge will use Central Valley bridge ties put into a section of Micro Engineering track.


Monday, January 18, 2021

A layout video of sorts

Having always enjoyed seeing layout videos I wanted to create some for my own layout.  What has kept me from doing this was that I could not find a video editor that was easy enough for me to use.  Over the past several years I had tried several both purchased and free and I found them all rather hard to learn and tedious to use. 

As a sort of new years resolution I was determined to try again to find something I could use.  After looking at a few more editor programs I found something called Shotcut.  It was a free download but what made it work for me were the many tutorial videos on youtube that are presented by many different people.  After finding some presenters that spoke in an understandable way and did not go too fast, I was able to go back and forth between the program the video tutorials until I caught on.

Not having any good videos of the layout right now I put together as a first project a short slide show of still photos including captions and some background music.  This allowed me to practice working with most of the same functions that would be in an actual video.  When this current layout expansion is done and the main line is opened I plan to get some videos.  So here's the link to the video slideshow:


Tuesday, January 12, 2021

Electrical considerations for a lift bridge

When adding a removable section of tracks to span a gap in the layout such as the entry door to the layout room some thought has to be given to a few problems. 

How will any needed wiring pass through the bridge ?

My train room was built in the back half of a garage that is about 70 years old.  The concrete floor was in poor enough condition that I elected to build a raised floor which ended up being about 9 inches above the concrete garage floor.   Anticipating that layout wiring may need to span across the doorway I included a 1 inch diameter electrical conduit that connects each side of the doorway.  This conduit travels down the wall on each side and under the ramp that leads from the garage floor at the door up to the raised floor if the layout room

A pull line had been left in this conduit when it was installed so it was easy to pull in an 8 conductor, 18 gauge cable at this point in the layouts development.  Each end of the cable was terminated on a terminal strip.  A new pull line was also pulled in at the same time so future cables can be installed the same way.


How are the tracks on the bridge itself connected to track power ?

In this case there are 2 tracks that go across this bridge with each being connected to a different DCC Specialties PSX-1 DCC circuit breaker.  While there are special door hinges used for electrical door locks that could be used, these are quite expensive so I am just using 4 flexible wires.  These wires are 18 gauge but are made up of many smaller strands and that is what makes them more flexible.  The ends are connected to terminal strips so can easily be replaced if movement eventually causes any of them to break.  


What prevents a train from approaching the bridge when the bridge is open ?

At the end of the bridge that does not have the hinge,  there is a magnetic switch within the frame that the bridge fits into and it's activating magnet that is within the end of the bridge itself.  The bridge has to be fully closed for the switch to activate.   


The magnetic switch controls this group of 5 single pole relays.  4 of the relays control track power, 1 for each rail of 2 tracks.  When the track is installed, it will have an additional isolated gap a few feet from either side of the bridge.   This will stop a train from approaching the bridge when the gate is up.  The 5th relay will be to control a warning light outside the door indicating that the gate is lowered.


Sunday, January 3, 2021

Adding wifi throttles to the layout

I had been considering adding another utility throttle when the Digitrax LNWI caught my eye.  The LNWI is a Wifi module that connects to the Loconet and will allow a smart phone with a throttle app to be used as a throttle.   These cost about the same as a wired UT4 throttle and will support several smart phone throttles.


There was nothing to installing this new module, I just plugged in the power and connected it to the existing Loconet and it was ready to go.  There are several free throttle apps available and the one I am using is called WiThrottleLite.  It worked the first time I tried it, no problems.  I found the WiThrottleLite app very easy to use and it also has a flashlight function built in which may be handy when uncoupling those cars in the shadows.


Thursday, December 31, 2020

2020 - A year devoted to the home layout

This past year of course has been a very challenging time for almost everyone.  I do feel fortunate that I have this layout to keep me busy doing something creative and that helps ease the feeling of "cabin fever".  With all train shows and conventions being canceled this year and being home all of the time I have been able to enjoy more model railroading time than I would have normally.  And with no shows I was not motivated to work on any modules so all of that time went into this layout.  Besides working on the continuing expansion of the layout I was also able to finish some side projects on various other parts of the layout.  Here are some of those projects with links to posts made on them:

This winter I am again participating in the annual Trainboard.com Winter Layout Party.  I have noticed that there seems to be more people participating this year so I must not be the only one spending more time with their layout.

Already the N Scale convention in Sparks, Nevada that was scheduled for next June has been canceled and I suspect that it is going to still be some time before it will be safe to travel or have train shows again.   Until then, I'll just keep working on my railroad.

Happy New Year !

Wednesday, December 23, 2020

The crooked path across the bridge

Back in June I posted about the lift bridge I had constructed across the entry into the train room, that post can be seen HERE.  After six months and changing seasons it has remained quite stable.  With this current layout expansion the bridge will be needed so now to put some track on it.   The idea of my bridge is to use tunnel portals and hillsides to hide the bridge being in the scene.  

The actual Palisade tunnels that this part of the layout represents on are on a straight alignment but I am going to take some liberties with the track alignments through these tunnels to make my track plan work.   The tunnel portals on the right or west side are angled to allow for a larger radius curve around the corner.   


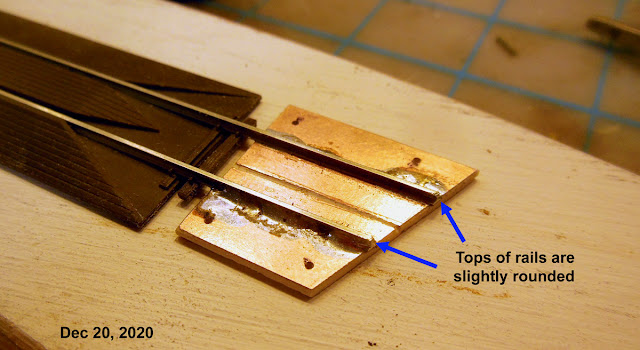
At the points where the tracks meet at the gaps I am using copper clad PC board as these will hold the track very stable.  I was able to buy the material on ebay in a 2" x 6" size and then cut it into 1" x 2" sizes.   These were then cut at the angle that the track will cross the gap.  Each of the 4 track / gap angles are different.  Holes were drilled on both sides for track nails and a groove was cut through the copper cladding to isolate the rails.


On the lift bridge we built many years ago at the Ntrak club, we used Atlas code 80 re-railer tracks at the gaps.  The idea was that if a set of wheels gets derailed at the joint it will get re-railed right away.  This has worked out well so I wanted to try the same idea on my layout's lift bridge.  A friend had recently given me some Atlas code 55 re-railer tracks and the rails were a perfect match for the Mico Engineering track I am using.   Traffic will move mostly in one direction on each track so the re-railers are placed the side after the train crosses the gap.   Another lesson learned from the Ntrak bridge experience was to round the tops of the rail end a bit.  This helps with smooth running but also with a shirtsleeve being snaged when someone goes through and pulling up the track.


The gaps were done in pairs on the work bench with the second one being done with a tracksetta tool in place to hold the alignment and the track gauge was carefully checked with both an NMRA track gauge and a caliper.


So at this point the   track is in place and everything seems to roll smoothly over the joints with no derailments.  After the holidays I will post about the electrical aspects of the bridge.


Friday, December 11, 2020

River bottom and land forms for Palisade Ranch

The sub-roadbed has been completed through the new Palisade Ranch section of the layout and the cork roadbed is well underway.  So now I am also working on adding the river bottoms and the land forms.  This needs to get fairly far along before I install the track and bridges especially toward the back and under the bridges.  The bench work frame is only 2 inches thick here and the river will be at the top of that frame so strips of scrap were glued onto the existing structure of the bench work to create support for the river bottom.


Next the river bottom made of hard board was glued into place on top of those supports.  The river will round the corner around the corner to the right and disappear behind the built up track.

I am using similar methods for the terrain as I have before on this layout.  For some of the terrain I am using building insulation foam board.  Along the back of the scene the hills will be built up to blend in with the backdrop.   This will then be covered with a layer of plaster cloth.  A long sheet of .030 styrene is slipped in front of the backdrop to protect it while all the scenery work is going on.


In some larger areas I use the plaster cloth over cardboard strip method.    The cardboard that works best for me is from Postal Service Priority Mail boxes that items sometimes come in.  It is corrugated but thinner than most corrugated cardboard.  I cut it into strips about 1/2 inch wide across the corrugations so it will bend easily without any sharp kinks.   The ends are glued with yellow carpenters glue and either pinned or clamped to the surrounding structures.  Areas like this usually get 2 layers of the plaster cloth.


Thursday, December 3, 2020

Plan and start for the new section

In a post on October 31st I had shown a prototype photo of what the next section of the layout will represent.  Here is another photo of the same area taken from just above the tunnels on Palisade Ranch Road that I like to use as a reference.  I suspect that the road access is the reason that this is one of the most photographed areas on this line and so I am calling this section of the layout the Palisade Ranch section.  The through truss bridges in the distance is in the spot that the concrete trestle will be on the layout.   

 In planning this new section I used some red rosin paper left over from a painting project and cut a section of that to match the shape and size of the new area to be modeled.    Laying it out on the floor I bent some track to the desired radius and laid them in place along with the bridges and tunnel portals that had already been built to get an idea of what I could accomplish in this space.  With Sharpie pen I drew in the key features.

Of course my model of this scene is going to have to be quite compressed and is going around a corner.  I want to include Palisade Ranch Road in this scene and that is indicated by the yellow line drawn in with Photoshop over the tunnels.  The location of the curved concrete trestle is also pointed out with yellow.


Construction on this new section is moving along.   There was already the basic structure in place that was supporting the temporary turnaround loop so working off of that all of the sub roadbed for both lines has been established.  Cork roadbed is now being installed and next will be the river bottoms and then some terrain can get started.