Monday, September 25, 2017

On the road again - Bozeman, MT

For about the past two weeks my wife and I have been on a driving trip with our travel trailer.   On trips like this I often come across railroad related things which make good subjects for a post and this time was no different.

We spent a couple of days in Bozeman, Montana and while looking for a hiking trail near our camp I found this Northern Pacific depot.  It was abandoned and boarded up but looks like it has a decent roof so maybe there is hope for a future as a museum or model RR club.


The depot was not fenced in but was clearly marked as being under the control of the Montana Rail Link RR.  The MRL main line was next to the depot site but I did not see any trains go by while I was in the area.  Did hear a few at night from our camp site.


The trail started near the depot and there was this plaque that explained some of the history of what was called the Story Mill Spur.


The trail had to follow a road for a short distance and cross the MRL main line.  Along side the road there were at least 3 different lumber operations.  No mill, just packaged lumber and also a spur for either loading or unloading of the product.  I could not tell which for sure.
Along most of the trail the right of way was wide enough that the track was still in place.  In this photo both the trail and the track are seen side by side.


There was this spot where the trail passed under Interstate 90 where the tracks had been removed and then started up again on the other side.


I followed the trail for maybe another 1/4 mile beyond the I-90 overpass and it looked something like this photo.  The old railroad tracks are still there in the weeds to the right of the trail.


Saturday, September 9, 2017

Modification to Showcase Express display cases

These display cases are a great way to enjoy the parts of your collection that won't fit on the layout.  I have several and have found them to be quite versatile but have been making one small modification to some of the end caps.

The end caps that come with the display case are wide enough that they stop the clear insert from sliding out, see red arrow in photo.  For my purposes I would like to be able to slide the insert out without having to remove the end cap.

The modification is to simply make the end caps on one side of the display case narrow enough for the clear insert to slide past.

The end caps for the N scale sized display are about 1.23 inches wide and I determined that removing about .1 inch was enough.  This is done on the edge of the end cap that would be facing outward.


I found that sliding the end cap back and forth against 100 grit sand paper laid on a flat surface did the trick in a couple minutes.

After the width was reduced the edge on both sides were de-burred with a hobby knife run back and forth.

The last step was to polish the new edge with some plastic scratch remover I use for control panels.

The end result is that I have easier access to the locomotives in the display case above the staging yard.  Because this particular display case has two 4 foot sections end to end I needed to do both sides.

For more information about Showcase Express display cases see their Web Site.

Saturday, September 2, 2017

Trying to get organized

For a little over a year now I have been doing data entry work in support of creating a comprehensive data base of all N scale items ever produced.  Recently I was introduced to another feature of the data base, a personal item inventory.

If you are not already familiar with this data base, please check it out by clicking HERE.  All you need is a Google account to sign up.


Like many of us in this hobby, I have many more locomotives and rail cars than I could ever run at one time and keeping them organized has been a challenge for me. Sometimes I acquire something that I already have because I forgot I have it, sound familiar ?  I have tried to use spreadsheets to keep track of things but the files ended up getting lost or corrupted.  So I thought I would try using the inventory function of the data base as it will be on a server somewhere and someone other than me is going to back it up, etc.

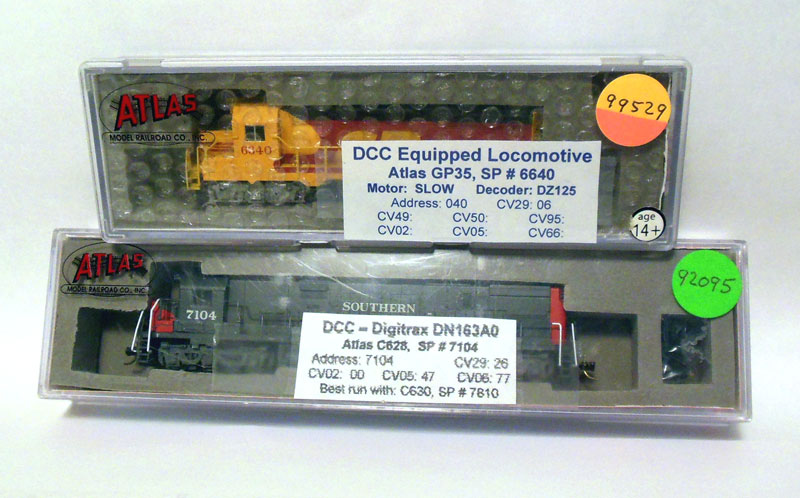
As I enter my collection into my inventory I am placing a color coded sticker on the box with the data base reference number on it.  Having the sticker will tell me that the item has been included in my inventory and the sticker color will indicate which era on my layout it belongs to.

In This Post from back in 2014 I explained how I was planning to have 3 different eras on the layout.

I purchased some adhesive stickers in different colors and write the inventory ID number on these while at the same time setting the era.


I decided to start with the locomotives.  The numbers on the stickers are the data base ID numbers.  When an item overlaps 2 of my layout eras I place a half of one color over the other.  As an example the Kodachrome GP35 in this photo could belong to the 83 to 88 era or the 89 to 96 era.
So far I have gone through most of the locomotives that have decoders.  As I do I am placing the engines that belong to the layout in the display case above the staging yard.  Each row is for a different era.  The empty plastic boxes are light and can be stored in an overhead cabinet.


There are also some yellow dots and I am using those to mark the inventory ID number on items that don't have anything to do with this layout.  I run these on the modular layout setups I attend.

The GP9's in this photo all have the same ID number on the sticker.  That's because I had bought them as non numbered models and put the numbers myself. 

It's nice not having that box of extra engines sitting on the floor.  Hopefully I can keep this going and have a more efficient railroad.